
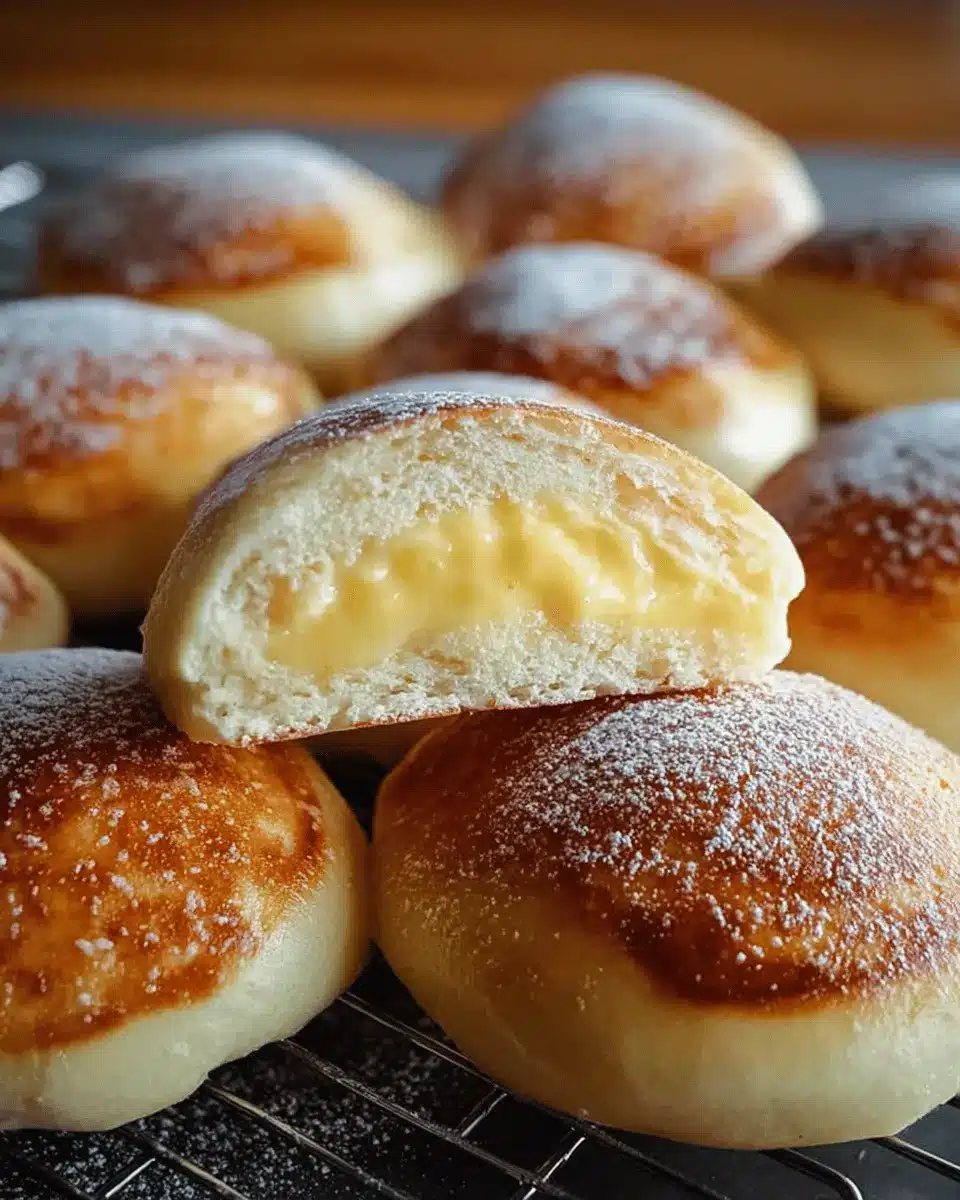
Introduction to Stovetop Custard Cream Buns
When it comes to delightful homemade snacks, stovetop custard cream buns steal the show. Why opt for these buns, you ask? Well, for starters, they offer a unique twist on traditional baked goods. By cooking them on the stovetop, you save time and energy while achieving a soft, fluffy texture that’s nothing short of heavenly.
Imagine sinking your teeth into a warm, milk bun, with velvety custard melting in your mouth. These treats are not just scrumptious; they are incredibly versatile. Perfect for breakfast, a light dessert, or even an afternoon snack, they easily fit into any meal plan.
One of the best things about making stovetop custard cream buns is the ease with which you can adjust flavors. You can use homemade custard, store-bought options, or even experiment with different fillings. Plus, they’re a fun way to get creative in the kitchen! If you're looking to impress friends or family, these buns are an instant crowd-pleaser.
So, gather your ingredients and let’s dive into the delightful world of stovetop custard cream buns that promise to be a hit in your home! For more custard-related inspiration, check out this comprehensive guide on custard variations, which can give you additional ideas on flavors and textures to explore.

Ingredients for Stovetop Custard Cream Buns
Creating soft and delightful stovetop custard cream buns starts with the right ingredients. Here’s what you’ll need to gather:
For the dough
- 1 ¾ cup all-purpose or cake flour: The main building block for the buns, giving them that fluffy texture we all crave.
- 1 teaspoon instant dry yeast: This little powerhouse helps the dough rise beautifully.
- 1 tablespoon white granulated or castor sugar: Sweetens the dough and enhances browning during cooking.
- ⅓ teaspoon salt: A critical component that balances sweetness and strengthens the dough.
- ½ cup warm water: Activates the yeast for a lovely rise.
- 1 tablespoon milk: Adds richness to the dough.
- 1 tablespoon oil (canola or sunflower oil): Keeps the buns moist and tender.
For the filling
The filling is where the magic happens! Choose one of the following options for a luscious custard:
- Homemade custard powder: Try this easy 3-ingredient custard recipe that’s egg-free and gluten-free!
- Store-bought custard powder: Simple and quick, just follow the package instructions.
- Egg-based custard: Use your favorite recipe for a traditional taste.
With just these ingredients, you're at the threshold of making scrumptious stovetop custard cream buns. Happy baking!
Preparing Stovetop Custard Cream Buns
Creating delicious stovetop custard cream buns is not as challenging as it might seem. Let’s dive into the steps needed to transform simple ingredients into a delightful treat that your friends and family will adore. This guide will walk you through each stage, ensuring you have everything you need for a successful baking adventure.
Make the dough
The first step to your delicious buns begins with the dough. Start by gathering your ingredients:
- 1 ¾ cup all-purpose or cake flour
- 1 teaspoon instant dry yeast
- 1 tablespoon sugar
- ⅓ teaspoon salt
- ½ cup warm water
- 1 tablespoon milk
- 1 tablespoon canola or sunflower oil
In a large bowl, combine the instant dry yeast, sugar, salt, and flour. In a separate container, mix the warm water, milk, and oil, then pour this mixture into your flour blend. Knead the mixture for about 5 minutes until it becomes a smooth and soft dough. Once done, cover the bowl and let the dough rise in a warm, draft-free spot for about an hour.
Prepare the custard filling
While your dough rises, it’s the perfect time to prepare the custard filling. You can choose from several options for the custard, including:
- Homemade custard powder – Check out my easy recipe for 3-ingredient custard powder.
- Store-bought custard powder – Simply follow the package instructions to mix it with milk.
- Egg-based custard – Use your favorite recipe, ensuring you cook it well before adding it to the buns.
Regardless of your choice, let the custard cool completely before filling the buns.
Fill the buns
After the dough has risen, it's time to punch it down and knead it for an additional 3 minutes. Divide the dough into 12 equal pieces and roll each piece into a circle. Take a teaspoon of your cooled custard and place it on one half of the circle. Gently fold the other half over, pressing the edges to seal them well. Give the filled buns 15 minutes to rest, allowing the dough to relax.
Cook the custard buns
Now, let's get cooking! Heat a non-stick pan over low heat, and if you don’t have one, cut parchment paper to fit and brush it with a little oil. Carefully place the custard buns into the pan. Cook them on low for about 10 minutes, then flip and cook the other side for an additional 5 minutes. Be sure to watch them closely to prevent burning.
Let them cool
Once cooked, remove the buns from the pan and let them cool for a few minutes. This is the moment to dust them with powdered sugar if desired. And just like that, you’ve created a batch of warm, inviting stovetop custard cream buns ready to be enjoyed!
With these steps, you should feel confident in making these scrumptious buns. Happy cooking!

Variations on Stovetop Custard Cream Buns
Chocolate Custard Filling
For a delightful twist, try a chocolate custard filling in your stovetop custard cream buns. Simply substitute part of the milk in your custard recipe with melted dark chocolate or cocoa powder. This creates an indulgent, rich flavor that chocolate lovers will adore! Pair it with a sprinkle of sea salt for some extra depth, and you’ve got a real winner.
Fruit-Flavored Custard Filling
If you're craving something fruity, consider a fruit-flavored custard filling. You can easily customize store-bought custard by adding pureed fruits such as mango, strawberry, or raspberry. This not only enhances the taste but also gives a refreshing burst of color. Imagine biting into a soft bun filled with vibrant, fruity custard—it's a perfect way to brighten up your day!
For more innovative custard ideas, check out Pastry Arts for inspiration!
Cooking tips and notes for Stovetop Custard Cream Buns
Kneading tips
When kneading your dough, aim for a smooth and elastic texture. If the dough sticks to your hands, sprinkle a little more flour. Knead for about 5–8 minutes, and if you're unsure, the windowpane test—stretching a small piece until translucent—can help you gauge readiness.
Stovetop cooking techniques
Cooking your stovetop custard cream buns at a low heat is crucial. This ensures they cook evenly without burning. Flip them carefully after 10 minutes, and consider covering the pan with a lid to trap steam, which helps keep the buns soft. For extra flavor, a light brush of oil or melted butter before cooking can add a lovely richness! Want more tips? Check out articles on stovetop cooking techniques from culinary experts like Serious Eats.
Serving suggestions for Stovetop Custard Cream Buns
Perfect pairings with drinks
When enjoying your stovetop custard cream buns, consider pairing them with a warm drink for the ultimate comfort snack. A classic cup of coffee or tea complements the sweetness beautifully. If you’re in the mood for something refreshing, try a chilled glass of almond milk or a fruity herbal tea — the floral notes enhance the butteriness of the buns.
Creative serving ideas
Get a little creative when serving these delightful treats!
- Dust them with powdered sugar for an elegant touch.
- Serve with berries on the side for a pop of color and freshness.
- Consider adding a dollop of whipped cream or a scoop of ice cream for a fun dessert twist.
Experiment with these serving suggestions to elevate your stovetop custard cream buns experience!
Time Breakdown for Stovetop Custard Cream Buns
Preparation Time
Get excited! You’ll need about 15 minutes to whip up the dough for these delectable stovetop custard cream buns. That’s just enough time to gather your ingredients and get everything mixed up.
Cooking Time
Once the dough is ready, you’ll spend around 30 minutes cooking the buns on the stovetop. This part is all about watching them transform into golden, fluffy treats.
Total Time
All said and done, from start to finish, expect a total of 45 minutes. In under an hour, you’ll have a dozen delicious custard-filled buns to enjoy with your morning coffee or as an afternoon snack!
For more tips on cooking times and techniques, check out this handy guide. Happy baking!
Nutritional Facts for Stovetop Custard Cream Buns
Understanding the nutritional profile of these delightful Stovetop Custard Cream Buns can help you enjoy them guilt-free. Here’s a quick breakdown:
Calories
Each bun contains approximately 85 calories, making them a relatively light treat. They can fit nicely into your breakfast or snacking options.
Carbohydrates
Packed with about 15 grams of carbohydrates per serving, these buns provide a quick energy boost, perfect for a busy morning or afternoon snack.
Protein
With around 2 grams of protein, they offer a subtle protein kick that complements the rich custard filling. Consider pairing them with a side of Greek yogurt for an extra protein boost!
For more detailed nutritional insights, check out Nutrition Data or the USDA's food database. Making informed choices can enhance your culinary experience and keep you energized throughout the day!
FAQ about Stovetop Custard Cream Buns
Can I make the dough ahead of time?
Absolutely! You can prepare the dough for your stovetop custard cream buns ahead of time. After kneading, simply place it in an airtight container and store it in the refrigerator for up to 2 days. When you're ready to bake, let it sit at room temperature for about 30 minutes to rise before shaping the buns.
What should I do if my custard doesn't thicken?
If your custard doesn’t thicken, don’t fret! It might need a bit more cooking time. Keep stirring it on low heat until you see a thicker consistency. Alternatively, you can mix a little cornstarch with water and slowly add it to the custard while it’s cooking. Just give it a few minutes to set.
How do I store leftover custard buns?
To store any leftover stovetop custard cream buns, simply place them in an airtight container and keep them in the fridge. They can last for about 2-3 days. Reheat them gently in a non-stick skillet or microwave before serving for that fresh-out-of-the-pan taste!
Conclusion on Stovetop Custard Cream Buns
In summary, stovetop custard cream buns are an irresistible treat that effortlessly combines a soft, fluffy texture with a creamy custard filling. They're perfect for breakfast or as a delightful snack. Enjoy making them with loved ones for an extra special touch, and savor that delicious homemade goodness!

Stovetop Custard Cream Buns
Equipment
- large bowl
- saucepan
- non-stick pan
- measuring jug
Ingredients
Dough Ingredients
- 1.75 cups all purpose / cake flour
- 1 teaspoon instant dry yeast
- 1 tablespoon white granulated or castor sugar
- 0.33 teaspoon salt
- 0.5 cups warm water
- 1 tablespoon milk
- 1 tablespoon canola or sunflower oil
Filling Options
- homemade custard 3-ingredient custard powder (egg free, gluten-free) or store-bought
- egg based custard Use your favorite egg based custard powder recipe
Instructions
Making the Dough
- Combine the instant dry yeast, sugar, salt, and flour in a large bowl.
- Mix together the warm water, milk, and oil, then add it to the flour mixture.
- Knead for 5 minutes until it forms a smooth, soft dough.
- Cover and leave to rise for an hour in a warm, draft-free area.
Filling and Cooking the Custard Buns
- After the dough has risen, punch it down and knead for 3 minutes.
- Divide the dough into 12 equal pieces and roll out each piece into a circle.
- Place a teaspoon of the cooled custard on half of the circle and fold the other half over to cover.
- Press and seal the edges well and leave to rest for 15 minutes.
- Heat a non-stick pan on low heat and brush with a little oil.
- Cook the buns on low heat for 10 minutes, then flip and cook the other side for 5 minutes.
- Remove from the pan and allow to cool for a few minutes before serving.
- Dust with powdered sugar if preferred.


Leave a Reply