
Introduction to Dairy Free Chocolate Pie
Creating a delectable dessert that accommodates dietary preferences doesn’t have to be a challenge. Our Dairy Free Chocolate Pie is proof that you can enjoy rich, chocolatey goodness without traditional dairy ingredients. Whether you're lactose intolerant, vegan, or simply seeking to lighten up your dessert game, this pie hits the spot!
Why Choose Dairy Free Chocolate Pie?
So why go dairy-free with your chocolate pie? For starters, it caters to a wider audience, ensuring everyone can indulge without worry. Dairy-free options can also be lighter on the stomach while allowing you to savor every bite. Imagine a smooth, velvety filling made from dairy-free chocolate chips and topped with luscious whipped coconut cream that brings a delightful texture contrast.
Not to mention, using almond butter instead of cream provides a nutty undertone that complements the chocolate beautifully. Plus, it's egg-free and soy-free, making it a perfect choice for those with multiple dietary restrictions. If you want to add a personal touch to your gatherings, this pie can be a stunning centerpiece. And let's be real—who could resist a slice of this dream dessert?
For more information on making dairy-free desserts, check out some tips from The Vegan Society and see what other delicious options await!
Ingredients for Dairy Free Chocolate Pie
Creating a delightful Dairy Free Chocolate Pie is simple and requires just a handful of tasty ingredients. Here's what you'll need:
For the pie:
- Dairy-free pie crust – You can make your own or pick a store-bought option. Just ensure it’s fully baked and cooled before adding the filling.
- 10 ounces dairy-free chocolate chips – Choose semisweet or dark varieties to create a rich flavor.
- 1 (13.5 ounce) can full-fat coconut milk – This is key for a creamy texture. Make sure it’s the full-fat version for the best results.
- ½ cup natural almond butter – This adds a nutty richness that complements the chocolate beautifully.
- 1 teaspoon vanilla extract – A must-have for a delightful aroma and flavor.
- ¼ cup pure maple syrup – This natural sweetener perfectly balances the chocolate richness.
For the topping:
- 1 (13.5 ounce) can full-fat coconut milk, refrigerated for at least 24 hours – Remember to chill it for that luscious whipped topping!
- 2 tablespoons confectioners’ sugar, or to taste – Sprinkle in sweetness to your preference.
- ½ teaspoon vanilla extract – A dash more vanilla adds depth to the whipped cream.
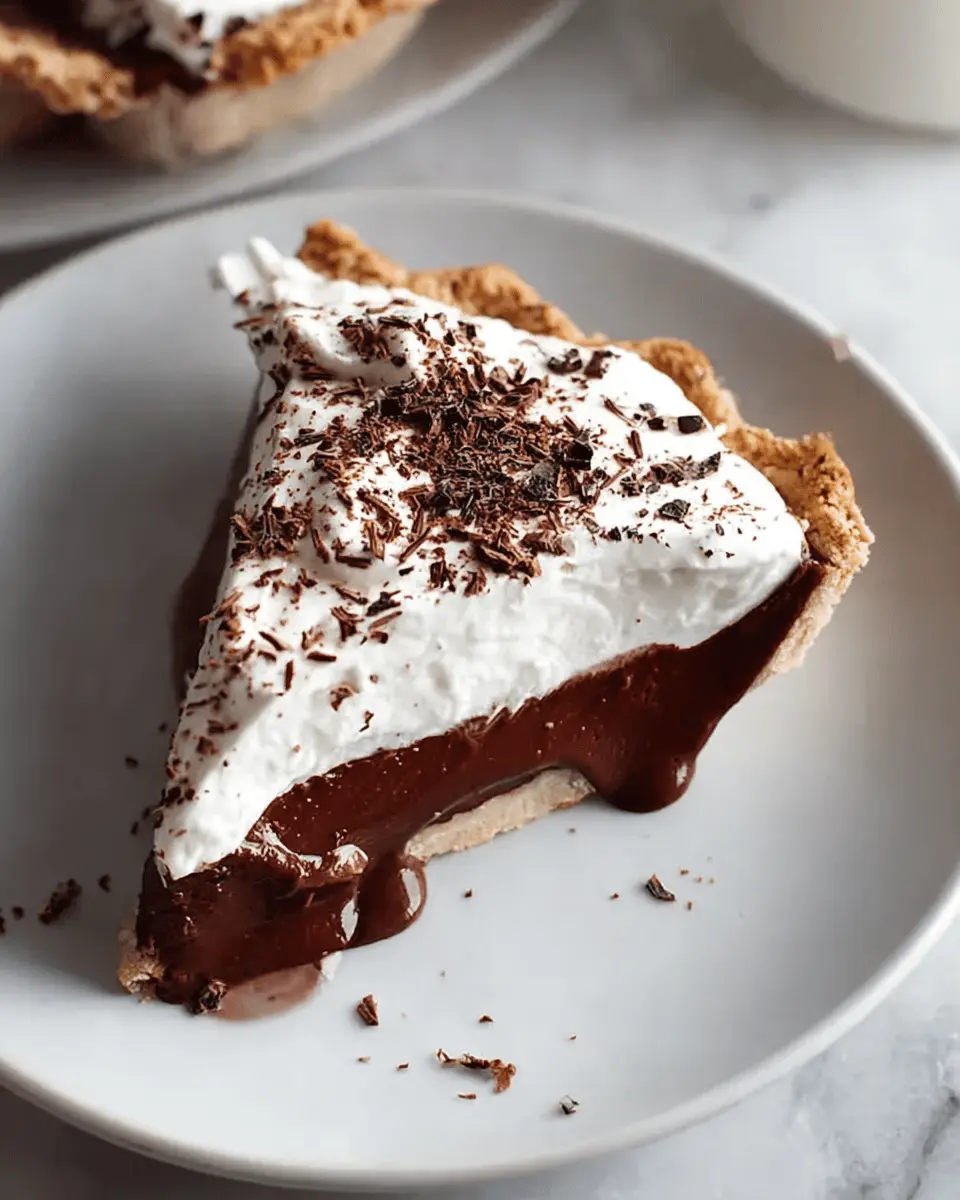
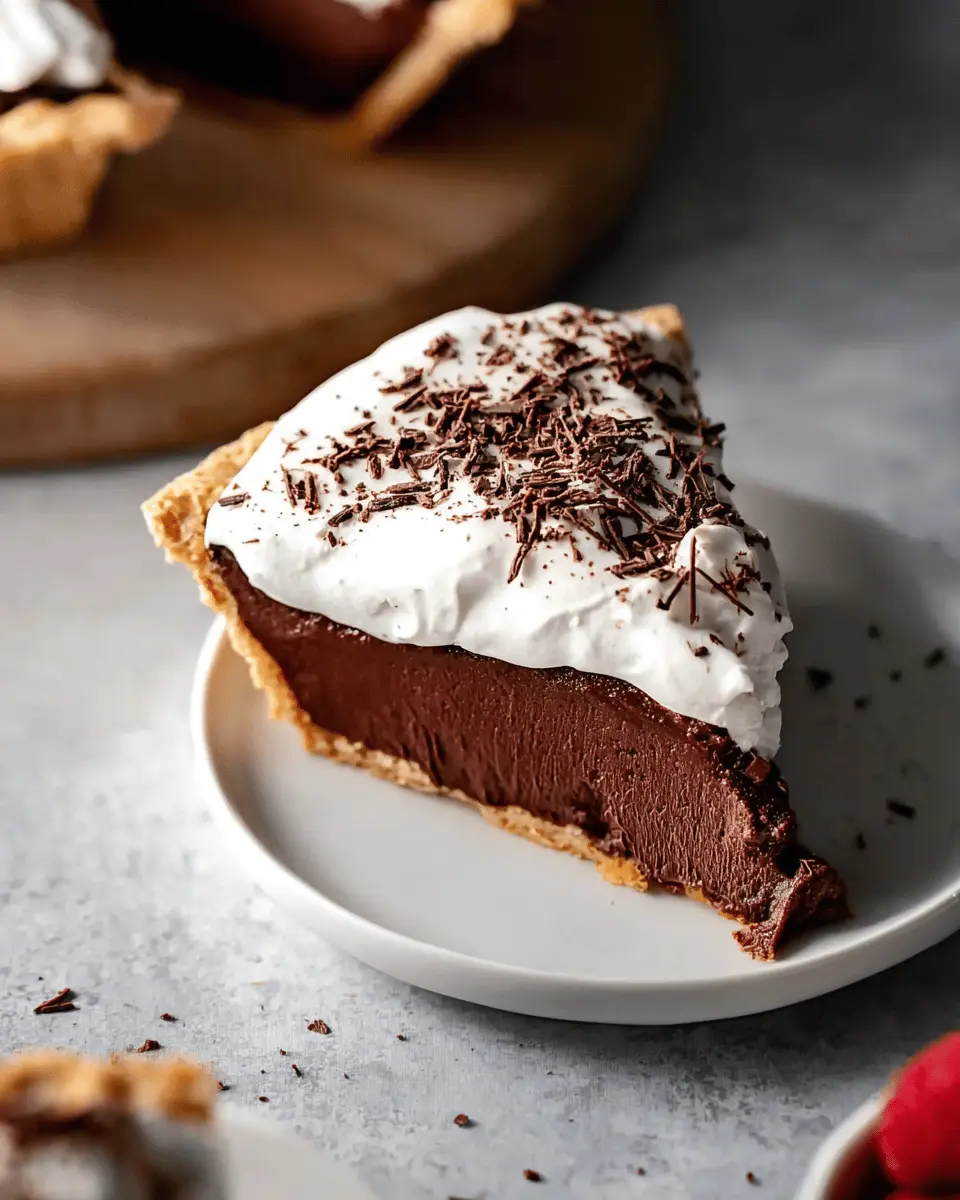
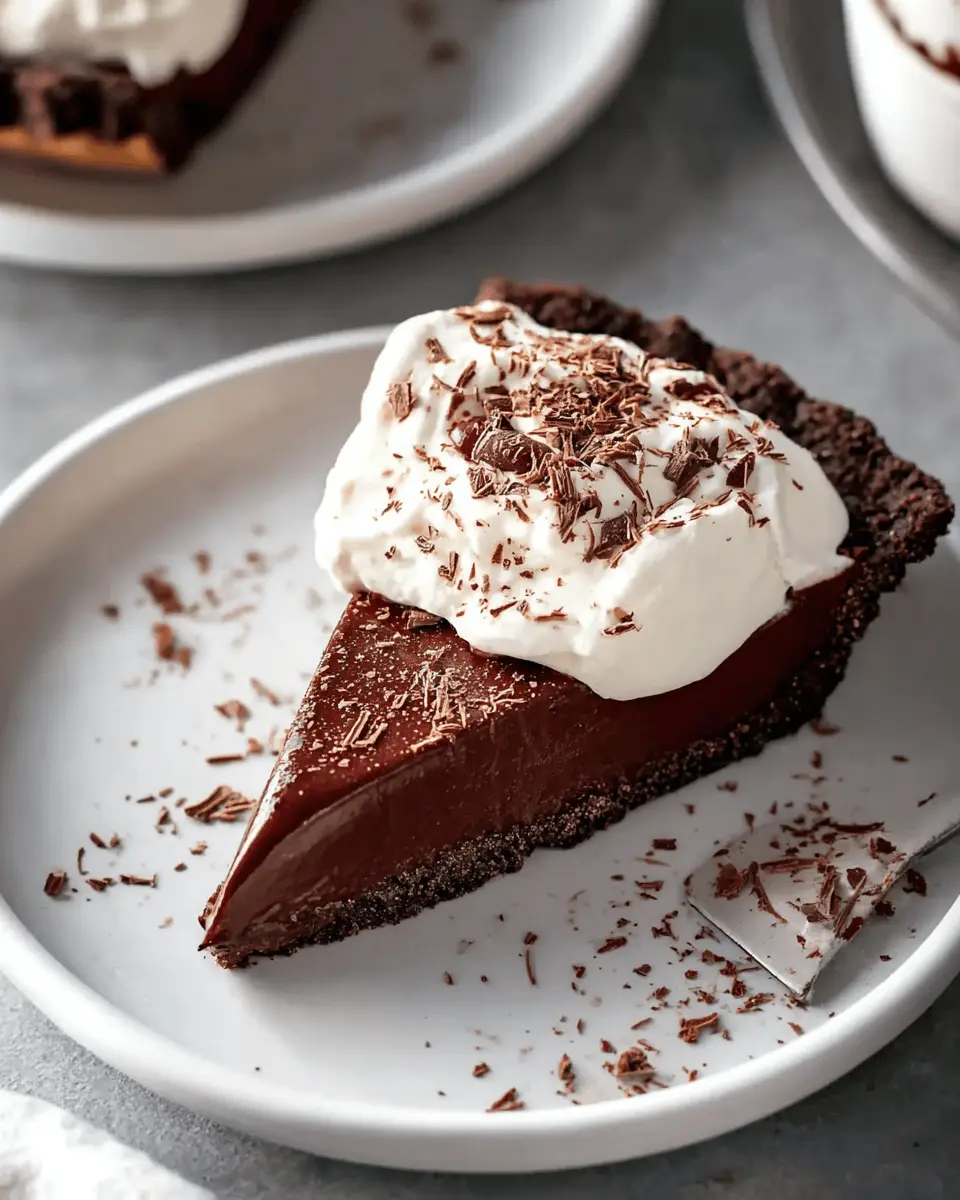
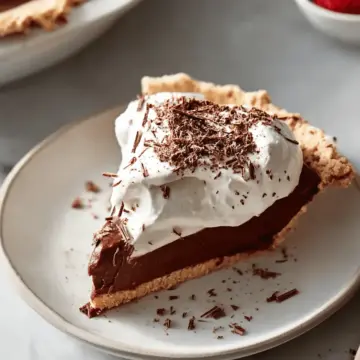
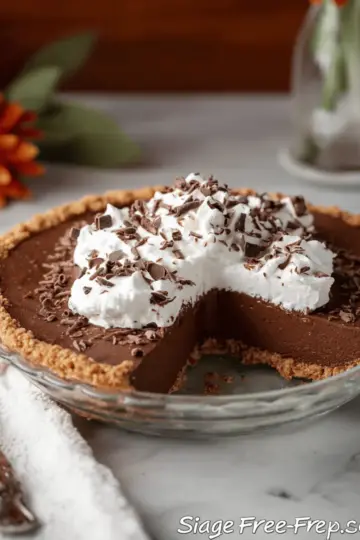
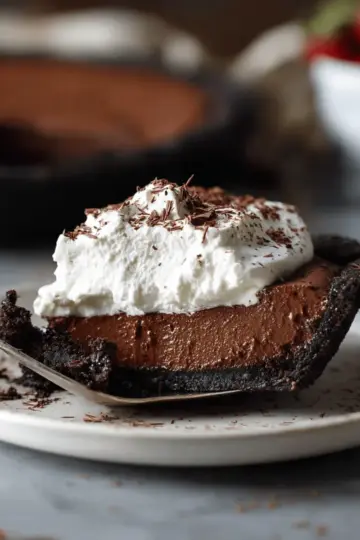
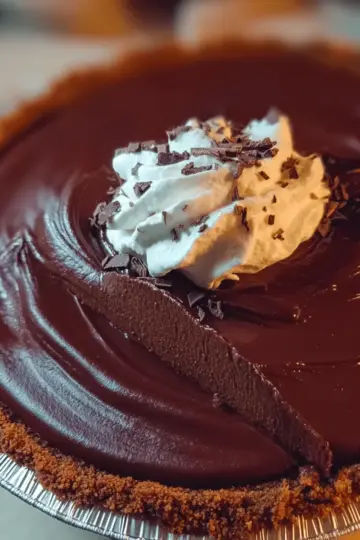
- Dairy-free chocolate shavings or chocolate chips for garnish – These finish the pie off with a beautiful, tempting touch.
Feel free to explore additional resources for tips on perfecting your pie crust or working with coconut milk for that ultra-creamy texture! Enjoy crafting this heavenly dessert.
Step-by-Step Preparation for Dairy Free Chocolate Pie
Creating a Dairy Free Chocolate Pie is a delightful experience that guarantees to satisfy your sweet tooth and impress your friends. Let’s dive into each step to ensure your dessert turns out perfectly delicious.
Make the pie crust
First things first, you'll need a sturdy, scrumptious pie crust. You can either make your own using a simple dairy free recipe or opt for a pre-made store-bought option. If you're going homemade, be sure to follow the instructions closely, and fully bake and cool the crust before moving on to the next steps. This ensures that your crust holds up against the creamy filling. You can find a great homemade recipe here.
Prepare the filling
Now for the star of the show—the filling! In a small to medium saucepan, combine 10 ounces of dairy free chocolate chips, one can of full-fat coconut milk, and ½ cup of almond butter. Place this mixture over medium-low heat and whisk frequently until everything is melted and beautifully smooth. Once your mixture is combined, remove it from the heat and stir in 1 teaspoon of vanilla extract and ¼ cup of pure maple syrup. The result will be a rich, chocolatey mix that will make your kitchen smell divine!
Chill the pie
After your filling is ready, pour it into the cooled pie crust. Now comes the hard part—patience! Transfer your pie to the refrigerator and let it chill for 4 to 6 hours (or ideally overnight). This step is crucial; it allows your pie to set, resulting in a silky, dense texture that just can't be beaten.
Create the coconut whipped cream
While you wait, you can prepare a decadent topping! Open a can of refrigerated full-fat coconut milk (make sure it’s been chilling for at least 24 hours to separate the cream from the liquid). Scoop the hardened coconut cream into a mixing bowl, leaving behind the watery liquid. With a hand mixer, whip the cream until it's fluffy and light. You can add 2 tablespoons of confectioners’ sugar (or adjust to your taste) and ½ teaspoon of vanilla extract. Whip again until fully incorporated. Voilà! You now have a delightful whipped topping ready to crown your pie!
Assemble the pie
At long last, it’s time to assemble your Dairy Free Chocolate Pie! Once it’s set, spread the fluffy coconut whipped cream over the pie, being careful to leave some border for aesthetic appeal. You can even sprinkle on some chocolate shavings or chips for a little extra flair. If you’re feeling patient, let the pie chill for another hour for the whipped cream to firm up a bit. Slice it up with a sharp knife, wipe it clean after each cut for neat slices, and get ready to share this vegan delight!
Enjoy the process, and remember—the best moments in cooking come from sharing your delicious creations with friends and family!
Variations on Dairy Free Chocolate Pie
Nut Butter Alternatives
Looking to switch things up for your Dairy Free Chocolate Pie? Experiment with nut butter alternatives! While almond butter is delicious, try cashew butter, sunflower seed butter, or even peanut butter for a different flavor profile. Each option adds a unique twist to the rich, chocolatey filling, making it even more indulgent. Don't forget to adjust the sweetness based on your choice, as some nut butters can be naturally sweeter than others.
Adding a Fruit Layer
Want to elevate your Dairy Free Chocolate Pie game? Consider adding a layer of fresh fruit! Slices of raspberries, strawberries, or bananas not only add a pop of color but also a refreshing contrast to the rich chocolate. Simply layer the fruit on top of the chocolate filling before chilling it. You can also purée fruit for a swirl effect, blending flavors and enhancing the dessert’s appeal. For a fun variation, try a layer of pureed mango or acai to introduce some tropical vibes!
Cooking Tips and Notes for Dairy Free Chocolate Pie
Choosing the Right Chocolate Chips
When making your Dairy Free Chocolate Pie, opt for high-quality semisweet or dark chocolate chips to enhance the flavor. Brands like Enjoy Life are great since they focus on allergen-friendly options. Always check the label to avoid any hidden dairy ingredients, ensuring a smooth, rich filling that every chocolate lover will adore.
Coconut Cream Consistency
For the perfect topping, refrigerate your coconut milk can for at least 24 hours prior. This step is crucial as it allows the cream to solidify, separating it from the liquid. If the cream doesn’t stiffen up, don’t worry; just blend in a bit more confectioners’ sugar to help it hold its shape. Remember, a creamy topping will elevate your Dairy Free Chocolate Pie to the next level!
Serving Suggestions for Dairy Free Chocolate Pie
Pairing with Vegan Ice Cream
To elevate your Dairy Free Chocolate Pie experience, consider serving it with a scoop of creamy vegan ice cream. The rich, chocolatey flavor contrasts well with the cool and smooth texture of almond or coconut-based ice creams. Try flavors like vanilla, mint chocolate chip, or even raspberry sorbet for a burst of fruity tang.
Presentation Ideas
First impressions matter! Serve your pie on a lovely cake stand and sprinkle it with fresh berries for a pop of color. You can also add a drizzle of warm chocolate sauce or a dusting of cocoa powder for added flair. The fluffy coconut cream topping invites a touch of creativity—consider adding crushed nuts or even edible flowers for an eye-catching finish.
By focusing on thoughtful pairings and appealing presentations, your Dairy Free Chocolate Pie will not only taste incredible but also look stunning at your next gathering!
Time Breakdown for Dairy Free Chocolate Pie
Preparation Time
Getting started with your Dairy Free Chocolate Pie is quick and easy! You'll only need 10 minutes to gather your ingredients and whip up the chocolate filling.
Chilling Time
The real magic happens while the pie chills. Plan for 4 to 6 hours in the fridge to let that luscious filling set perfectly. For best results, consider chilling it overnight!
Total Time
All in all, you're looking at a total time of 5 hours and 15 minutes. Most of this is passive chilling time, allowing you to enjoy your day while your pie becomes a heavenly dessert.
With this time breakdown in hand, you can easily fit this delicious Dairy Free Chocolate Pie into your busy schedule. Want to customize it further? Check out more tips on making a perfect dairy-free crust to elevate your dessert game!
Nutritional Facts for Dairy Free Chocolate Pie
Calories
Each slice of this decadent Dairy Free Chocolate Pie comes in at approximately 496 calories. While it’s indeed indulgent, it’s well worth every bite for a special occasion or a well-deserved treat!
Healthy Fats
Notably, this pie is rich in healthy fats, with about 36 grams per serving. Most of these fats come from the full-fat coconut milk and almond butter, contributing to a creamy texture that satiates your cravings while offering nutritional benefits. The unsaturated fats promote heart health and provide essential nutrients—definitely why this dessert can be part of a balanced diet!
For more insights into healthy fats, check out the American Heart Association for great tips on maintaining a heart-healthy diet.
FAQs about Dairy Free Chocolate Pie
Can I use different nut butters?
Absolutely! While almond butter adds a delightful flavor to your Dairy Free Chocolate Pie, you can easily substitute it with other nut butters like cashew, peanut, or even sun butter for a nut-free option. Just remember that the flavor and consistency might vary slightly based on your choice.
How do I store the pie?
To keep your Dairy Free Chocolate Pie fresh, store it in an airtight container in the refrigerator. It should last for about 4-5 days. If you have leftovers, make sure to cover the pie with plastic wrap to prevent drying out. For best results, enjoy it chilled!
What if my coconut whipped cream doesn’t whip?
If your coconut whipped cream isn't whipping up nicely, it may be due to the coconut milk not being cold enough or not separating properly. This can happen with some brands. To troubleshoot, ensure your cans of coconut milk are well-chilled and use the cream-only part. If it’s still a no-show, you might consider using a dairy-free whipped topping as an alternative.
Conclusion on Dairy Free Chocolate Pie
In summary, this Dairy Free Chocolate Pie is not only a delightful treat but also a testament to how indulgent desserts can be made without dairy. Its creamy filling and fluffy topping create the perfect balance of flavors and textures. Enjoy this delicious dessert at your next gathering or simply treat yourself after a long day!
Dairy Free Chocolate Pie
Equipment
- saucepan
- mixing bowl
- hand mixer
Ingredients
For the pie
- 1 batch dairy free pie crust Use a fully baked and cooled crust.
- 10 ounces dairy free chocolate chips Semisweet or dark.
- 1 can (13.5 ounces) full-fat coconut milk
- ½ cup natural almond butter
- 1 teaspoon vanilla extract
- ¼ cup pure maple syrup
For the topping
- 1 can (13.5 ounces) full-fat coconut milk, refrigerated Refrigerate for at least 24 hours.
- 2 tablespoons confectioners’ sugar Or to taste.
- ½ teaspoon vanilla extract
- dairy free chocolate shavings or chocolate chips For garnish.
Instructions
For the pie
- Make the pie crust, then bake off fully according to the recipe instructions and allow to cool completely before proceeding.
- Add the chocolate chips, coconut milk and almond butter to a small to medium saucepan. Set the pan over medium-low heat and cook, whisking frequently, until combined and smooth. Remove from the heat and stir in the vanilla and maple syrup.
- Pour the mixture into the cooled pie crust, then transfer to the refrigerator and chill for about 4 to 6 hours, or until set.
For the topping
- Open the can of coconut milk and scoop the hardened coconut cream into a large mixing bowl. Using a hand mixer, whip the cream until fluffy.
- Add in the confectioners’ sugar and vanilla extract, then whip again until incorporated.
- Spread the topping over the chilled pie, then garnish with the chocolate shavings or chips.
- You can serve immediately OR transfer the pie back to the refrigerator and let chill for another few hours to give the coconut whipped cream time to set.
- Slice with a sharp knife, wiping it off after each slice.
Leave a Reply