
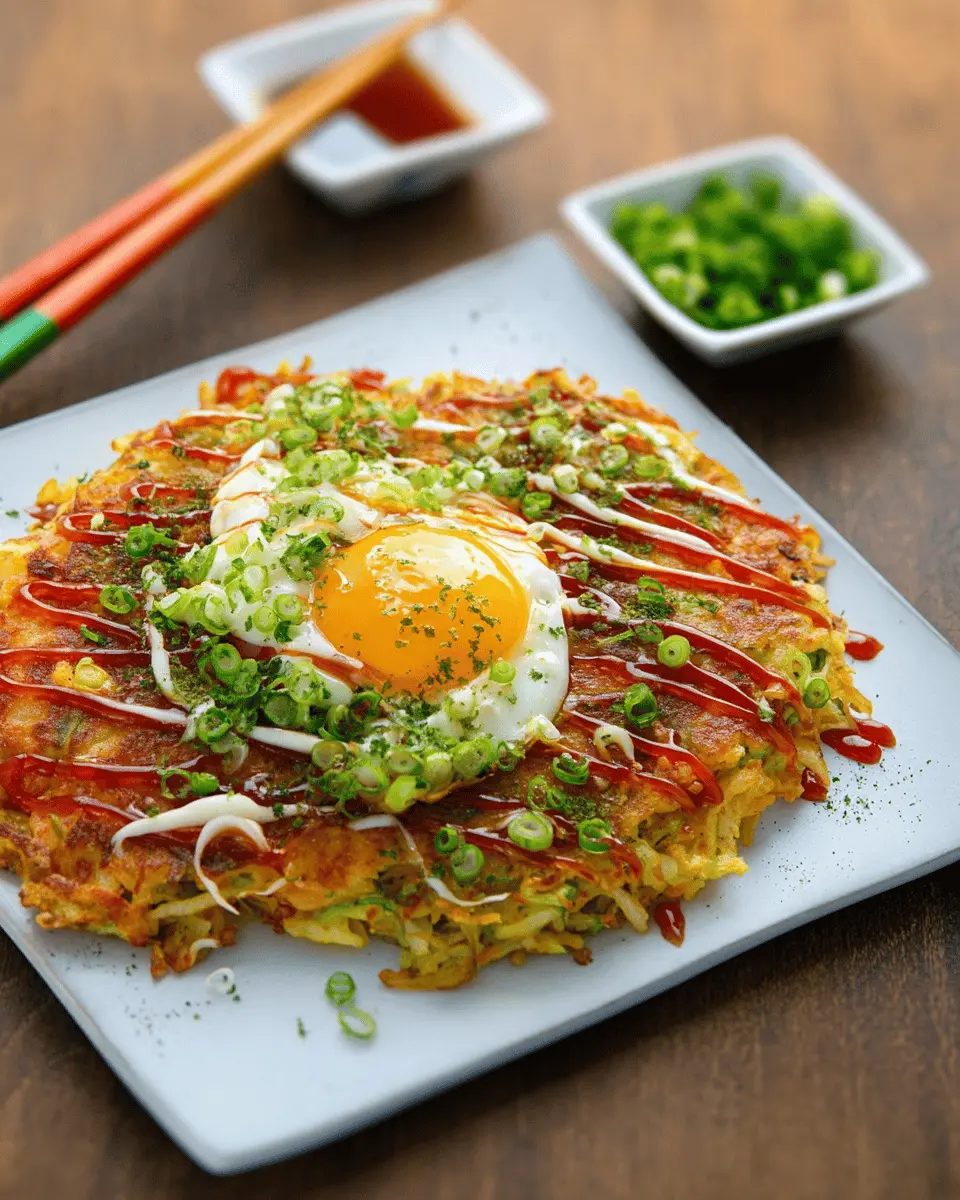
Introduction to Okonomiyaki
Imagine a dish that’s not only delicious but also incredibly versatile—okonomiyaki is exactly that! This Japanese savory pancake is a delightful way to enjoy a medley of ingredients, all while impressively catering to personal tastes. It’s a fantastic homemade meal for young professionals who are short on time but big on flavor.
Why Okonomiyaki is the Perfect Homemade Dish for Young Professionals
In the hustle and bustle of career life, finding time to cook a nutritious meal can feel daunting. That’s where this okonomiyaki recipe shines. With minimal prep time of just 10 minutes and a quick cook of 10 minutes, you’ll be savoring a delicious meal in no time.
Moreover, this dish allows for customization, meaning you can use whatever fresh veggies and proteins you have on hand. Love turkey bacon or chicken ham? Toss it in! Feeling experimental? Substitute in some seasonal veggies. The possibilities are endless.
Additionally, okonomiyaki is perfect for batch cooking. Make a few pancakes in advance, and you have ready-to-eat meals for the week. Plus, it’s an excellent way to showcase your culinary skills when hosting friends, offering them a taste of Japanese cuisine right at home. For more insights on Japanese cooking, check out Japan Centre. So, why not give this delightful dish a try? You might just find your new favorite go-to meal!

Ingredients for Okonomiyaki
Creating the perfect okonomiyaki recipe starts with gathering the essential ingredients. Don’t worry; they’re easy to find! Here’s what you’ll need:
Essential ingredients for your okonomiyaki
- ¾ tasse (175 ml) de farine tout usage
- ½ c. à thé (2,5 ml) de sel
- ½ tasse (125 ml) de bouillon de poulet ou d’eau
- 4 œufs
- 3 tasses (750 ml) de chou finement râpé
- 2 oignons verts, hachés finement
- 4 tranches de turkey bacon, cuit et émietté
- ¼ tasse (60 ml) d’huile de canola
These core elements deliver that classic okonomiyaki flavor you crave. It's a straightforward combination that brings your savory pancake to life!
Optional ingredients to personalize your dish
Want to jazz things up? Feel free to add any of these optional ingredients:
- 2 tasses (500 ml) de fèves germées
- 1 oignon vert, haché finement en diagonale
- 2 tasses (500 ml) de bonite à dos rayé en flocons séchés
- 3 c. à table (45 ml) de gingembre en saumure
- 3 c. à table (45 ml) de graines de sésame grillées
- 3 c. à table (45 ml) de sauce soya
- 1 c. à table (15 ml) de sauce Worcestershire
- 1 c. à table (15 ml) de sauce piquante de style asiatique
These optional add-ins allow for a personalized touch — mix and match to explore loads of flavor combinations! Don't hesitate to check sites like Serious Eats or Just One Cookbook for more tips. Your okonomiyaki will not only reflect your taste but also be a fun cooking adventure!
Step-by-step Preparation of Okonomiyaki
Creating a delicious and customized okonomiyaki recipe can be a delightful and rewarding experience. Follow these simple steps to whip up this flavorful Japanese dish.
Gather your ingredients
Before you start cooking, ensure you have all the essential ingredients on hand. The beauty of okonomiyaki is in its versatility, but for this classic version, you'll need:
- ¾ cup (175 ml) of all-purpose flour
- ½ teaspoon (2.5 ml) of salt
- ½ cup (125 ml) of chicken broth or water
- 4 eggs
- 3 cups (750 ml) of finely shredded cabbage
- 2 green onions, finely chopped
- 4 slices of turkey bacon, cooked and crumbled
- ¼ cup (60 ml) of canola oil
For garnishing, consider these extras:
- 2 cups (500 ml) of bean sprouts
- 1 green onion, diagonally sliced
- 2 cups (500 ml) of dried bonito flakes
- 3 tablespoon (45 ml) of pickled ginger
- 3 tablespoon (45 ml) of toasted sesame seeds
- 3 tablespoon (45 ml) of soy sauce
- 1 tablespoon (15 ml) of Worcestershire sauce
- 1 tablespoon (15 ml) of Asian-style hot sauce
Make sure to set up your cooking area with everything prepped and ready to go. This can save you time and keep the process smooth!
Make the batter base
In a large mixing bowl, start by combining the flour and salt. In a separate bowl, whisk together the chicken broth and eggs, making sure they're well blended. Add the liquid mixture to the flour and salt, stirring until just combined. Now, it’s time to fold in your shredded cabbage, chopped green onions, and crumbled turkey bacon. This will be your colorful, hearty batter, bursting with flavor.
Cook your okonomiyaki
Heat a large nonstick skillet over medium-high heat and add about 1 tablespoon (15 ml) of canola oil. Pour in about ½ cup (125 ml) of your batter, gently pressing down with a spatula to flatten it. Cook for 3 to 4 minutes, or until the bottom is golden brown. Carefully flip it over and cook for another 3 to 4 minutes. Repeat this process for the rest of the batter, adding more oil as needed.
Garnish and serve
Once your okonomiyaki is perfectly cooked, it’s time to get creative with your garnishes! Serve with a generous portion of bean sprouts, a sprinkle of sliced green onion, and a scattering of bonito flakes. Top it all off with pickled ginger, toasted sesame seeds, soy sauce, Worcestershire sauce, and a drizzle of hot sauce for that extra kick!
Enjoy your homemade goodness
Now, take a moment to appreciate your handiwork before diving in. Enjoy each bite of your homemade okonomiyaki, a delightful blend of flavors and textures that you can personalize to your taste. Whether you’re sharing this with friends or enjoying it solo, remember that cooking should be just as enjoyable as eating! Happy cooking!
For more tips on enhancing your okonomiyaki experience, check out this article from Just One Cookbook for more Japanese cooking inspirations!
Variations of Okonomiyaki
Vegetarian okonomiyaki options
For a delightful vegetarian twist on the traditional okonomiyaki recipe, consider using ingredients like sweet potatoes, mushrooms, and an array of colorful vegetables. You can also use tofu or tempeh instead of meat to boost protein content while keeping the flavors vibrant and satisfying. Top with creamy avocado or a tangy tahini sauce for added richness.
Fusion flavors to try
Why not take your okonomiyaki to the next level by experimenting with fusion flavors? Incorporate elements like smoked chipotle or sriracha for a spicy kick, or blend in some Italian herbs with sun-dried tomatoes for an unexpected twist. The possibilities are endless—get creative and make this dish uniquely yours! For further inspiration, check out creative recipes on Serious Eats.
Cooking Tips and Notes for Okonomiyaki
Common pitfalls to avoid
When trying your hand at this okonomiyaki recipe, remember to avoid overmixing the batter; a few lumps are perfectly fine! This helps maintain a fluffy texture. Also, don’t rush the cooking process—allow enough time for each side to achieve a lovely golden-brown color. Lastly, be mindful of heat; medium to medium-high is ideal. Too high could lead to burnt edges while the center remains raw.
Storage tips for leftover okonomiyaki
If you have leftover okonomiyaki, you can keep it fresh by wrapping individual servings in plastic wrap or storing in an airtight container. It can be refrigerated for up to three days. To reheat, simply pop it in the skillet with a dash of oil to bring back the crispiness. Alternatively, you could also try a toaster oven! For more storage tips, explore Food Safety.

Serving Suggestions for Okonomiyaki
Perfect sides to complement your meal
When enjoying your okonomiyaki recipe, pair it with fresh, crisp sides that enhance the overall experience. Consider serving it alongside:
- Miso soup: A comforting classic that balances the richness of okonomiyaki.
- Pickled vegetables: They add a zesty crunch and bring brightness to your meal.
- Cucumber salad: Toss sliced cucumbers with rice vinegar, sesame oil, and sesame seeds for a refreshing touch.
Ideal occasions for serving okonomiyaki
The versatility of okonomiyaki makes it suitable for various occasions. It’s perfect for casual weeknight dinners or a fun-filled weekend lunch with friends. You can impress guests at a cozy get-together or host a Japanese-themed dinner party. For a unique twist, try making it a DIY meal where everyone customizes their own creations! Whether it’s a weekday or a special event, this dish is sure to be a hit.
Time Breakdown for Okonomiyaki
Preparation Time
Preparing your delicious okonomiyaki recipe takes about 10 minutes. This involves mixing the ingredients and getting everything ready for cooking, so you can enjoy this dish in no time.
Cooking Time
Cooking the pancakes will take approximately 10 minutes. Each side will need around 3 to 4 minutes to get that perfect golden-brown crisp.
Total Time
In total, you’ll spend about 20 minutes from start to finish. That means you can whip up a tasty, homemade okonomiyaki dinner in less time than it takes to binge an episode of your favorite show! For more tips and ideas on toppings, check out this resource for an enriched experience. Happy cooking!
Nutritional Facts for Okonomiyaki
Calories per serving
Each serving of this delicious okonomiyaki recipe contains about 300 calories. It’s a filling option that won’t leave you feeling weighed down.
Protein content
Packed with approximately 15 grams of protein per serving, this dish makes for a great meal to fuel your day and support muscle health.
Sodium content
With 1060 mg of sodium per serving, it’s advisable to watch your intake, especially if you’re sensitive to salt. Opting for low-sodium alternatives can help balance this out.
For more insights into the nutritional benefits of these ingredients, you can check out sources like Healthline and NutritionalInsights.org.
FAQs about Okonomiyaki
What can I substitute for specific ingredients?
If you don’t have turkey bacon on hand, feel free to use chicken ham, or even leave out the meat for a vegetarian twist! For the stock, you can opt for low-sodium chicken broth or water if you're looking to cut back on sodium. Don’t have cabbage? You can try using kale or spinach. Get creative and tailor your okonomiyaki recipe to your taste!
How do I reheat okonomiyaki?
To reheat your okonomiyaki, simply place it in a skillet over medium heat for about 5 minutes on each side until warmed through. You can also pop it in the microwave, covered, for 1-2 minutes, but this may give you a softer texture compared to pan-frying.
Can I make okonomiyaki in advance?
Absolutely! You can prepare the batter ahead of time and store it in the fridge for up to a day. Just make sure to give it a good stir before cooking. Enjoy this delicious dish anytime by prepping it in advance! For more insights, check out resources like Nikkei Magazine and Just One Cookbook.
Conclusion on Okonomiyaki
Making okonomiyaki at home is an exciting culinary adventure! This versatile dish allows you to unleash your creativity with various ingredients and flavors, making it perfect for any occasion. Try this okonomiyaki recipe to impress your friends and family with a delicious taste of Japan that everyone will love!

Okonomiyaki
Equipment
- large bowl
- whisk
- non-stick skillet
- spatula
Ingredients
Base Ingredients
- ¾ cup all-purpose flour
- ½ teaspoon salt
- ½ cup chicken broth or water
- 4 eggs
- 3 cups finely shredded cabbage
- 2 green onions, finely chopped
- 4 slices cooked bacon, crumbled
- ¼ cup canola oil
Toppings
- 2 cups bean sprouts
- 1 green onion finely chopped diagonally
- 2 cups dried bonito flakes
- 3 tablespoons pickled ginger
- 3 tablespoons toasted sesame seeds
- 3 tablespoons soy sauce
- 1 tablespoon Worcestershire sauce
- 1 tablespoon Asian-style hot sauce
Instructions
Preparation Steps
- In a large bowl, combine flour and salt. In another bowl, whisk broth with the eggs, then combine both mixtures. Fold in cabbage, green onions, and bacon.
- In a large non-stick skillet, heat 1 tablespoon of oil over medium-high heat; add ½ cup of batter to the skillet, pressing gently with a spatula to flatten. Cook for 3 to 4 minutes or until the bottom is golden; flip and cook for another 3 to 4 minutes. Repeat with remaining batter, adding oil as needed.
- Serve with bean sprouts, green onion, bonito flakes, ginger, sesame seeds, soy sauce, Worcestershire sauce, and hot sauce.
- Yields 6 pancakes.


Leave a Reply