
Introduction to Mini Cannoli Cups
Mini cannoli cups are not just a dessert; they are a delightful experience! For young professionals navigating busy lives, these bite-sized wonders blend tradition and convenience. Imagine coming home after a long day, only to whip up a batch of these delicious treats in under an hour. With a prep time of just 15 minutes and minimal fuss, you can easily satisfy your sweet tooth or impress guests at a last-minute gathering.
These charming mini treats offer a taste of Italy without the hassle. You can make the crispy cannoli cups ahead of time, filling them only when you're ready to serve. This ensures they remain crunchy, and the rich, creamy filling stays deliciously fresh—no one likes a soggy pastry! Plus, they’re perfect for portion control, making it easier to indulge without going overboard.
Young professionals often juggle responsibilities and social outings, and having a go-to dessert like mini cannoli cups makes entertaining a breeze. And with their elegant presentation, these desserts can elevate any gathering, whether it's a casual dinner party or a formal celebration. To dive deeper into the world of quick and delightful desserts, check out this guide on easy dessert ideas.

Ingredients for Mini Cannoli Cups
Creating your own mini cannoli cups is straightforward, thanks to a few simple ingredients that pack a lot of flavor. Here’s what you need to get started:
Filling Ingredients
For the luscious filling, gather:
- 1 container (15 oz.) of whole-milk ricotta cheese, drained for the best texture
- ½ cup powdered sugar for sweetness
- 2 tablespoons granulated sugar to enhance the flavor
- 1 teaspoon finely grated orange or lemon zest for a zesty kick
- ½ teaspoon vanilla extract to add a touch of warm sweetness
Cannoli Cups Ingredients
To make the delightful cups that hold the filling, you’ll require:
- 1 box of refrigerated pie crusts, softened as per the package instructions (2 count makes it easy)
- 3 tablespoons turbinado sugar (a nice raw sugar for crunch)
- 1 teaspoon ground cinnamon to spice things up a bit
Garnish Ingredients
Finish off your mini cannoli cups with these tasty touches:
- ¼ cup of miniature semisweet chocolate chips or finely chopped pistachios for a delightful crunch
- Additional powdered sugar for a beautiful dusting
These ingredients come together to create a perfect balance of creamy, crunchy, and sweet. So, are you ready to impress your friends at your next gathering?
Preparing Mini Cannoli Cups
Creating mini cannoli cups is a fun and rewarding way to impress your friends and family with minimal fuss. Follow these essential steps for perfect results every time!
Preheat the Oven
First things first, you need to preheat your oven to 425°F (220°C). This step helps ensure that your miniature culinary creations will bake evenly and turn golden brown. Trust me—your future mini cannoli cups will taste so much better when baked at the right temperature!
Prepare the Pie Crust
Next up, it’s time to work with the pie crusts! Lightly flour your work surface and unroll two refrigerated pie crusts. For that extra zing, sprinkle both evenly with turbinado sugar and a hint of ground cinnamon. This combination not only adds flavor, but it also gives the crust a beautiful, crispy sweetness.
Using a rolling pin, gently roll over the tops of the crusts to press the sugar and cinnamon into the dough. Now grab your 2½-inch round biscuit cutter and cut out pastry rounds. Gently press each round into ungreased mini muffin cups. Don’t worry if you need to re-roll the scraps to get all 48 circles—it’s all part of the fun!
Bake the Cannoli Cups
With your cups neatly in place, bake them in the preheated oven for about 10 minutes, or until they are golden brown. You’ll know they’re ready by the delightful aroma wafting through your kitchen. Once done, allow the cannoli cups to cool in the pan for about 15 minutes before transferring them to a wire rack to cool completely. This step is crucial to maintain their crispiness!
Make the Filling
While those delightful cups are cooling, you can whip up the filling. In a large mixing bowl, combine 15 oz. of whole-milk ricotta cheese, ½ cup powdered sugar, 2 tablespoons granulated sugar, 1 teaspoon finely grated orange or lemon zest, and ½ teaspoon vanilla extract. Use an electric mixer on medium speed until the mixture is creamy and delicious! Transfer this filling into a 1-gallon zip-top resealable bag, seal it tight, and pop it in the refrigerator while you await your cups’ final cool down.
Pipe the Filling into Cups
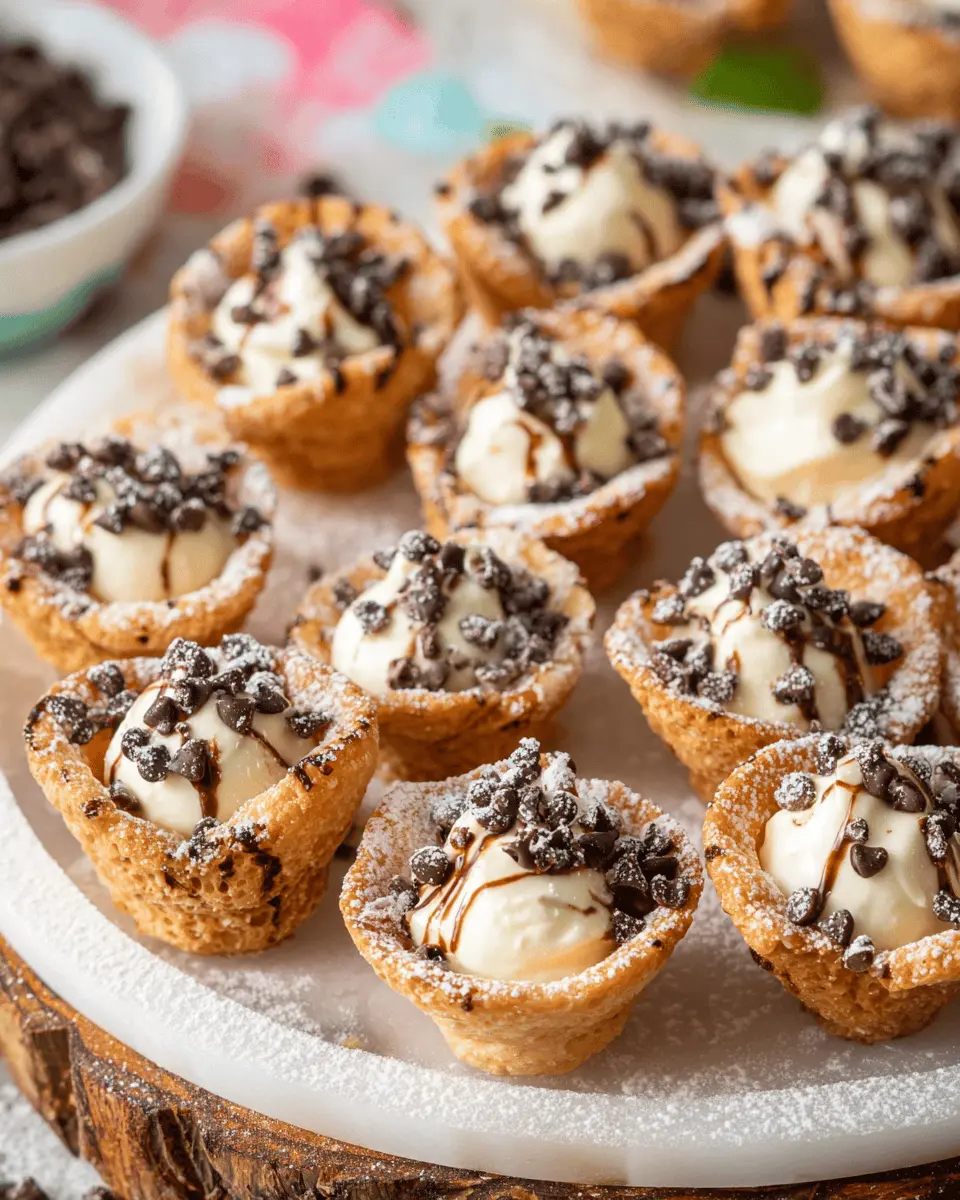
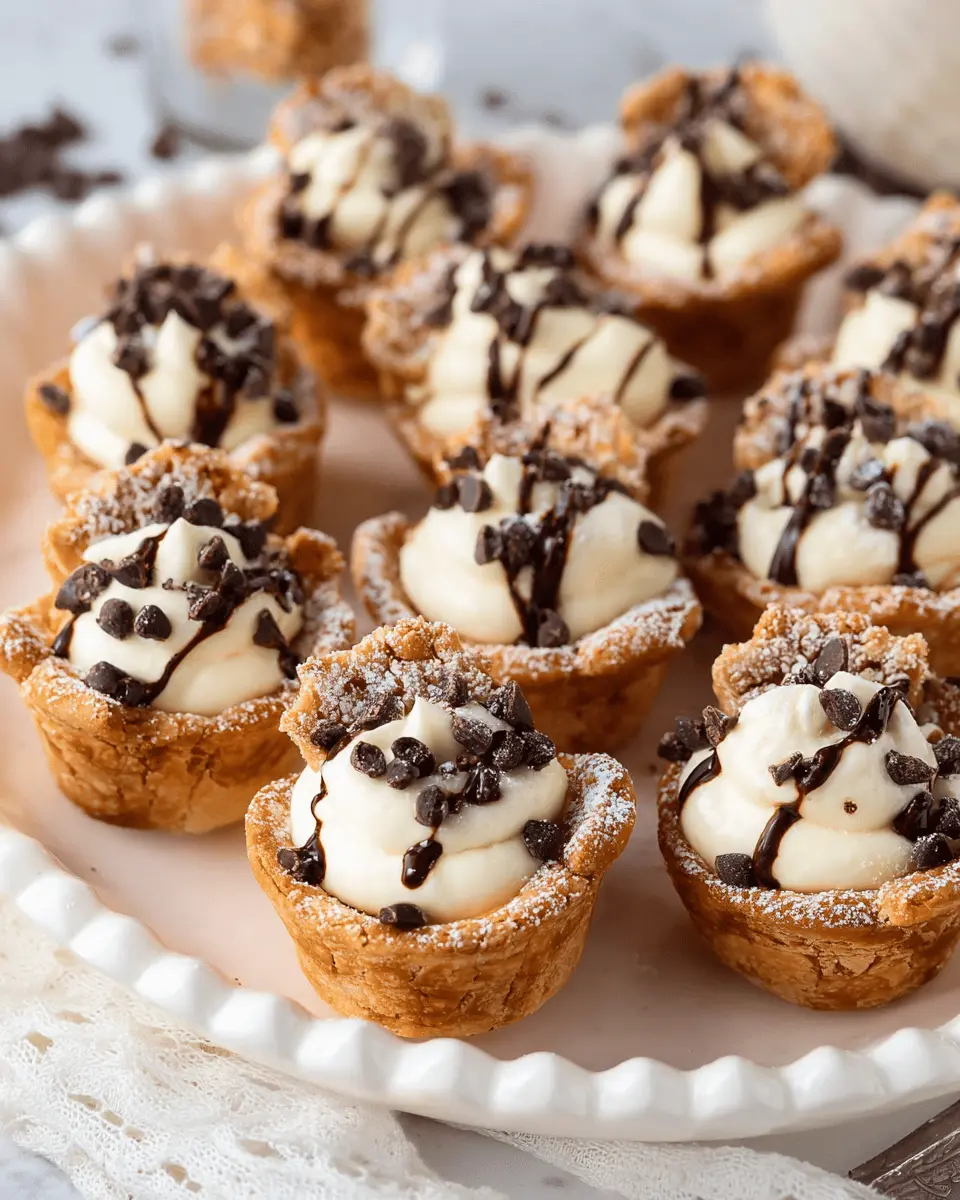
Just before it’s time to serve, remove that luscious filling from the fridge. Snip one corner off the bag and pipe around 1 tablespoon of filling into each cooled pastry cup. For that finishing touch, sprinkle with mini chocolate chips or finely chopped pistachios, then dust with a bit of powdered sugar. And voilà! You have beautiful mini cannoli cups ready for your guests to enjoy!
These steps will not only help you make unforgettable mini cannoli cups but also give you a taste of Italian dessert culture right at home. What better way to share sweet moments than through these delectable treats?
Variations on Mini Cannoli Cups
Mini cannoli cups are incredibly versatile, inviting creativity and personal flair. Here are two delicious variations to try!
Chocolate-Dipped Mini Cannoli Cups
For a decadent twist, melt some dark or semi-sweet chocolate and dip the edges of your mini cannoli cups. Once the chocolate hardens, fill them with your creamy ricotta mixture. The combination of rich chocolate and sweet filling elevates these treats to the next level. Don’t forget to sprinkle some mini chocolate chips on top for an extra indulgence!
Fruit-Infused Mini Cannoli Cups
If you’re looking to brighten up your mini cannoli cups, consider adding fresh fruit! Fold in chopped strawberries, blueberries, or even diced peaches into the filling. For a citrus twist, a splash of orange juice or lemon zest will enhance the flavor. Top with a slice of your favorite fruit to create a beautiful presentation. These refreshing options make for a delightful summer treat!
Experimenting with variations can only make your mini cannoli cups more enjoyable. For more inspiration, check out The Spruce Eats and Food & Wine for ideas!
Cooking Tips and Notes for Mini Cannoli Cups
Tips for Perfect Cannoli Shells
To achieve the crispiness you desire, make sure to roll the dough evenly and don’t skip the turbinado sugar and cinnamon topping—it really adds flavor! Bake until golden brown, keeping an eye on the time to avoid sogginess. Remember, filling them too early can lead to a mushy mess!
Best Practices for Filling
When preparing your filling for the mini cannoli cups, always drain the ricotta to ensure it's creamy and not watery. A zip-top bag is perfect for piping the filling—just snip off a corner for clean, easy dispensing. Remember to fill them just before serving to keep the texture fresh and delightful. Consider garnishing with chocolate chips or pistachios for that extra wow factor!
Serving Suggestions for Mini Cannoli Cups
Ideal Occasions for Serving
Mini cannoli cups are perfect for a wide array of gatherings, from casual get-togethers to elegant celebrations. Consider serving them at:
- Birthday parties
- Bridal or baby showers
- Holiday celebrations, like Christmas or Easter
- Potlucks and picnics
- Dessert tables for weddings
These delightful treats are sure to impress your guests and leave them wanting more.
Pairing Ideas for Beverages
When it comes to beverages, you want something that complements the rich and creamy filling of the mini cannoli cups. Try serving them with:
- Freshly brewed coffee or espresso for a classic Italian touch
- Flavored teas like chai or mint for a refreshing contrast
- Sparkling water with lemon to cleanse the palate
No matter what you choose, your guests will appreciate the thoughtful pairings! For more inspiring beverage ideas, check out this guide on drink pairings.
Time Breakdown for Mini Cannoli Cups
Preparation Time
Getting started with these mini cannoli cups is a breeze! You’ll need around 15 minutes to gather your ingredients and whip up the filling. It’s quick and satisfying, making it perfect for both seasoned bakers and kitchen novices.
Cooking Time
The cannoli cups themselves require a little time in the oven – about 30 minutes. This allows them to turn golden brown and develop that delightful crunch. Use this baking time to tidy up, sip on a cup of coffee, or even sneak a taste of that delicious filling!
Total Time
In just 45 minutes, you can create a tray of mini cannoli cups that are moist, flavorful, and ready to impress your guests. It’s the kind of recipe that makes hosting feel effortless. Why not plan your next get-together around this crowd-pleaser?
By the way, if you're curious about other fun dessert ideas, check out Baker's Delight for more inspiration!
Nutritional Facts for Mini Cannoli Cups
When you're whipping up a batch of mini cannoli cups, you might be curious about their nutritional content. Here’s a breakdown to help you indulge mindfully:
Calories
Each delightful mini cannoli cup contains approximately 71 calories. This makes them a lighter treat perfect for satisfying your sweet cravings without overwhelming your diet.
Sugar Content
With around 3 grams of sugar per cup, you'll enjoy a hint of sweetness without excessive sugar overload. It's a great way to satisfy your dessert desires while still being aware of your sugar intake.
Protein
These cute little cups deliver about 2 grams of protein each, thanks in part to the ricotta cheese filling. It’s a tasty way to include a bit of protein in your dessert!
Now that you know the nutritional facts, you can enjoy making and sharing these mini cannoli cups with friends and family, while keeping an eye on those calorie counts! For more information about mindful eating, check out Nutrition.gov for tips and guidance.
FAQs about Mini Cannoli Cups
Can I make the filling ahead of time?
Absolutely! You can prepare the filling for your mini cannoli cups a day in advance. Just mix your ingredients and store them in a sealed zip-top bag in the refrigerator. This not only saves time but allows the flavors to meld beautifully.
How do I store leftover cannoli cups?
For any leftover mini cannoli cups, it's best to store them separately from the filling. Keep the cups at room temperature while placing the filling in the refrigerator. This prevents the cups from getting soggy, ensuring they maintain their delightful crunch!
What can I substitute for ricotta cheese?
If you're not a fan of ricotta or need a substitute, consider using mascarpone cheese for a creamier texture or even Greek yogurt for a lighter option. Both alternatives work well and will give your mini cannoli cups a unique twist.
For more tips on ingredient substitutions, check out this helpful guide. Whether you're whipping up these delightful treats for a party or just treating yourself, we hope these FAQs make your baking experience smooth and enjoyable!
Conclusion on Mini Cannoli Cups
Recap of Why These Cups are a Must-Try
Mini cannoli cups are not just a delightful treat; they are incredibly easy to make, making them perfect for any occasion! These bite-sized wonders combine the rich, creamy filling with a crisp, sweet crust. They’re sure to impress your guests and leave everyone reaching for seconds. Don't miss out on trying this decadent yet simple dessert!

Mini Cannoli Cups
Equipment
- zip-top bags
- hand mixer
- mixing bowl
- mini muffin pan
- round biscuit cutter/cookie cutter
- Rolling Pin
- measuring cups and spoons
Ingredients
Filling
- 15 oz whole-milk ricotta cheese drained
- 0.5 cup powdered sugar
- 2 tablespoons granulated sugar
- 1 teaspoon finely grated orange or lemon zest
- 0.5 teaspoon vanilla extract
Cannoli Cups
- 2 count refrigerated pie crusts softened as directed on box
- 3 tablespoons turbinado sugar raw sugar
- 1 teaspoon ground cinnamon
Garnish
- 0.25 cup miniature semisweet chocolate chips
- additional powdered sugar
Instructions
Preparation
- Preheat the oven to 425°F.
- Lightly flour a work surface and unroll the pie crusts. Sprinkle both of the pie crusts with turbinado sugar and cinnamon. Gently roll a rolling pin over the top of the pie crusts to press the sugar and cinnamon into the dough. With a 2½-inch round cookie/biscuit cutter, cut out pastry rounds. Gently press each pastry round into ungreased mini muffin cups.
- Bake the crusts for 10 minutes, or until golden brown. Allow cannoli cups to cool completely in the pans, about 15 minutes, before removing them to a wire rack to cool completely.
- While the cups are cooling, prepare the filling by beating all of the filling ingredients with an electric mixer on medium speed in a large mixing bowl until creamy. Place the filling in a 1-gallon zip-top resealable bag. Seal bag. Refrigerate until ready to serve.
- Just before serving, remove the filling from the refrigerator. Snip one corner off of the bag and pipe approximately 1 tablespoon of filling into the cooled pastry cups. Sprinkle cups with mini chocolate chips or chopped pistachios. Dust with powdered sugar.
- Serve immediately.


Leave a Reply