
Introduction to Artisan Pizza Dough
Why Homemade Pizza is a Game Changer for Busy Professionals
In today’s fast-paced world, finding time to cook can feel like a monumental challenge. Enter artisan pizza dough! Making your own pizza can be a delightful alternative to ordering takeout, especially when you’re pressed for time. Not only is it a fun activity that can bring a little bit of joy to your weeknight routine, but it also allows you to control the ingredients.
Imagine having a fresh, homemade pizza ready in under 30 minutes with just a bit of prep on a Sunday evening. You can use quality toppings, skip unhealthy additives, and create the perfect pie tailored to your taste. Crafting your artisan pizza dough is surprisingly simple and requires only a handful of basic ingredients: flour, water, salt, and yeast. This means less stress and more satisfaction as you work with your own hands.
Moreover, the downtime while the dough rests gives you a chance to unwind for a few moments, whether it’s enjoying a podcast, scrolling through your favorite blog, or prepping a salad to accompany your meal. Want to learn more about the benefits of homemade pizzas? Check out this article by Food Network for insights that will inspire you to give it a try!
Ingredients for Artisan Pizza Dough
Crafting the perfect artisan pizza dough starts with a few essential ingredients that come together to create a delightfully chewy and flavorful crust. Let’s break down what you’ll need for your pizza-making adventure!
Essential ingredients for perfect dough
-
Flour: The backbone of your dough! Use 3 and ⅔ cups of all-purpose or whole wheat flour. Each option brings its unique flavor and texture, so feel free to experiment until you find your favorite.
-
Water: At 1 and ½ cups, room-temperature water hydrates the flour perfectly, making the dough pliable and easy to work with. Remember, if it feels too dry, a little extra water could do wonders.
-
Salt: This isn’t just for seasoning; 2 teaspoons of fine sea salt helps strengthen the dough structure and enhances the overall flavor.
-
Yeast: Instant yeast works best here for a quick rise. 2 teaspoons will unleash some magic, transforming your dough into a fluffy crust in no time!
Each ingredient plays a crucial role in achieving that irresistible artisan crust. Curious about how to make this dough shine? Dive into our Artisan Pizza Dough recipe here.
Preparing Artisan Pizza Dough
Creating the perfect artisan pizza dough is easier than you might think! With just a few simple steps, you can produce a dough that’s not only delicious but also impressive. Let’s break down the process for you.
Stirring up the dry ingredients
Start by gathering your dry ingredients. In a large mixing bowl, whisk together 3 and ⅔ cups of flour, 2 teaspoons of fine sea salt, and 2 teaspoons of instant yeast. This combination forms the foundation of your artisan pizza dough. Make sure the salt and yeast are evenly distributed; this will help ensure a consistent rise. If you're in need of some great flour options, you might check out King Arthur Baking for high-quality flours.
Mixing in the water
Now, it’s time to hydrate that flour! Gradually add 1 and ½ cups of room-temperature water to your dry ingredients. Using a rubber spatula or a wooden spoon, mix until the dough fully comes together. It may feel a bit sticky at first, but don't worry—this is a sign that you're on the right track. Once combined, shape the dough loosely into a ball.
The all-important rise
No great pizza crust is complete without a proper rise. Cover your dough with plastic wrap or a tight lid, then let it sit at room temperature for about 2-3 hours until it’s bubbly and has doubled in size. This rising period allows the yeast to work its magic. While you're waiting, why not prep some of your favorite toppings? You can even check out Serious Eats for topping ideas!
Dividing and shaping the dough
After the dough has risen, it’s time to divide it into portions. Flour your hands and remove ¼ of the dough from the bowl. Shape it into a round ball and place it on a lightly floured piece of parchment paper. Repeat this for the remaining dough, allowing you to create four 11-inch pizzas.
Rolling out for optimal crust
Now comes the fun part! Flour your rolling pin and start from the center of the dough, rolling outward. Make sure to rotate the parchment after each roll to get a nice, circular shape. Don’t stress if it isn’t perfectly round; personality is what makes handmade dough special! If the dough feels tough, let it rest for 5-10 minutes to relax.
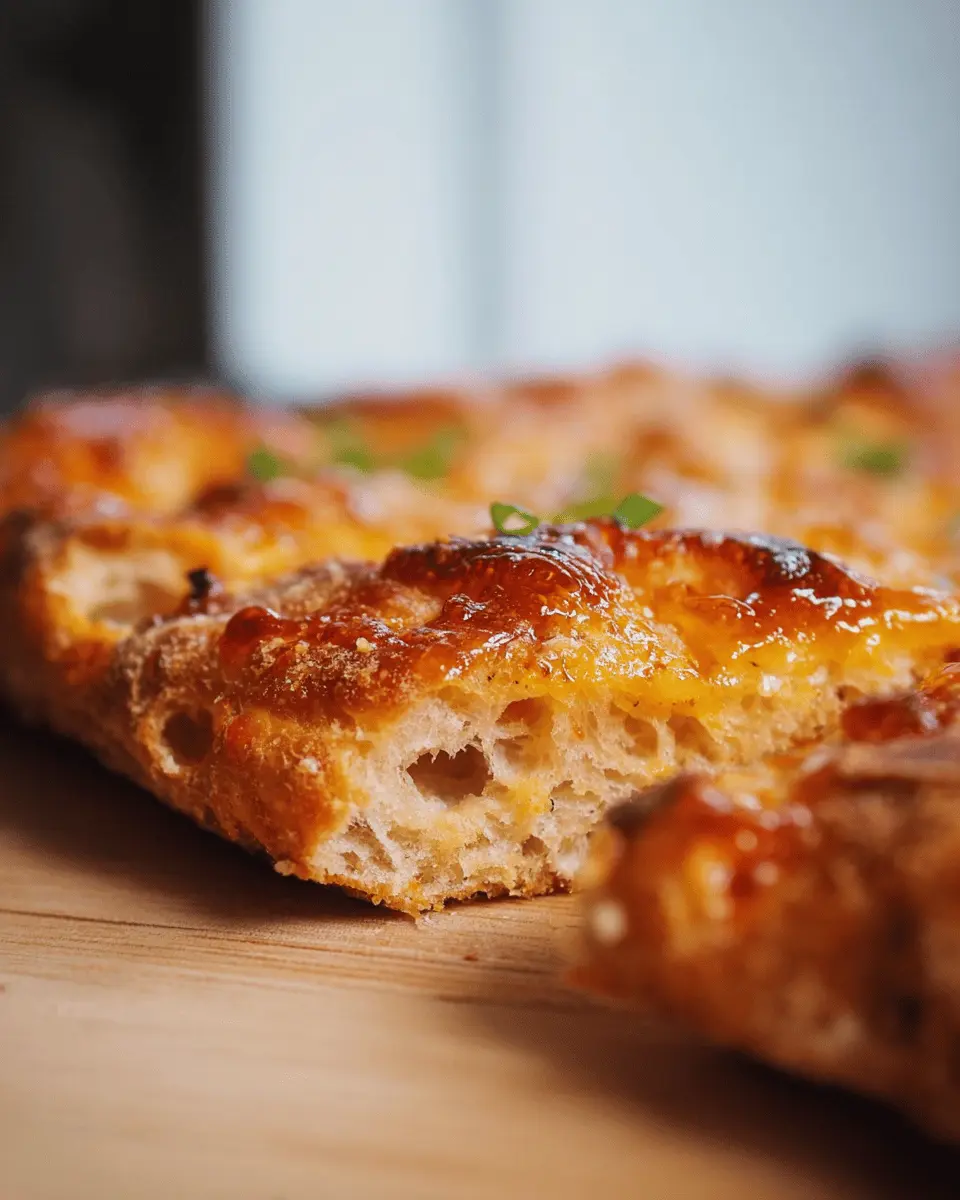
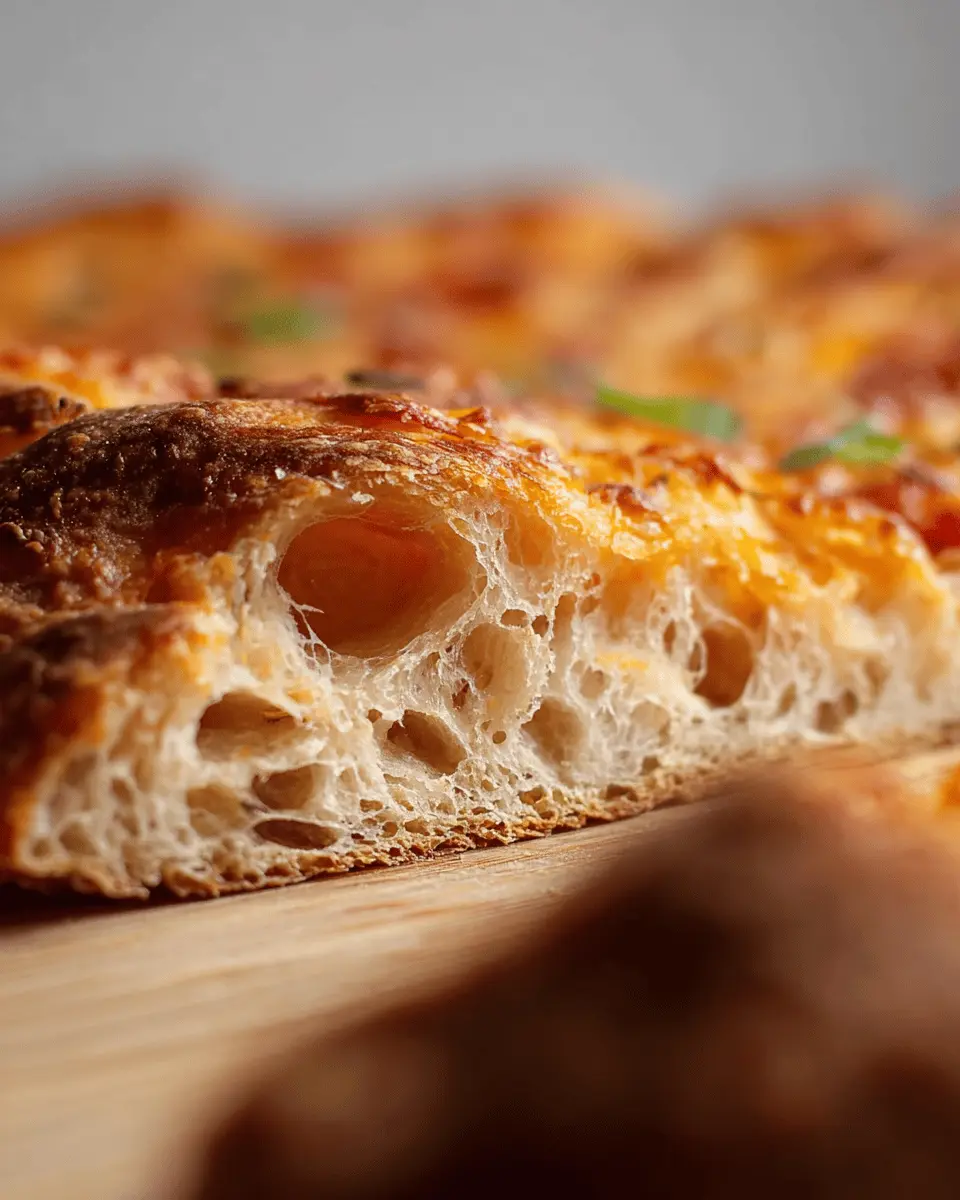
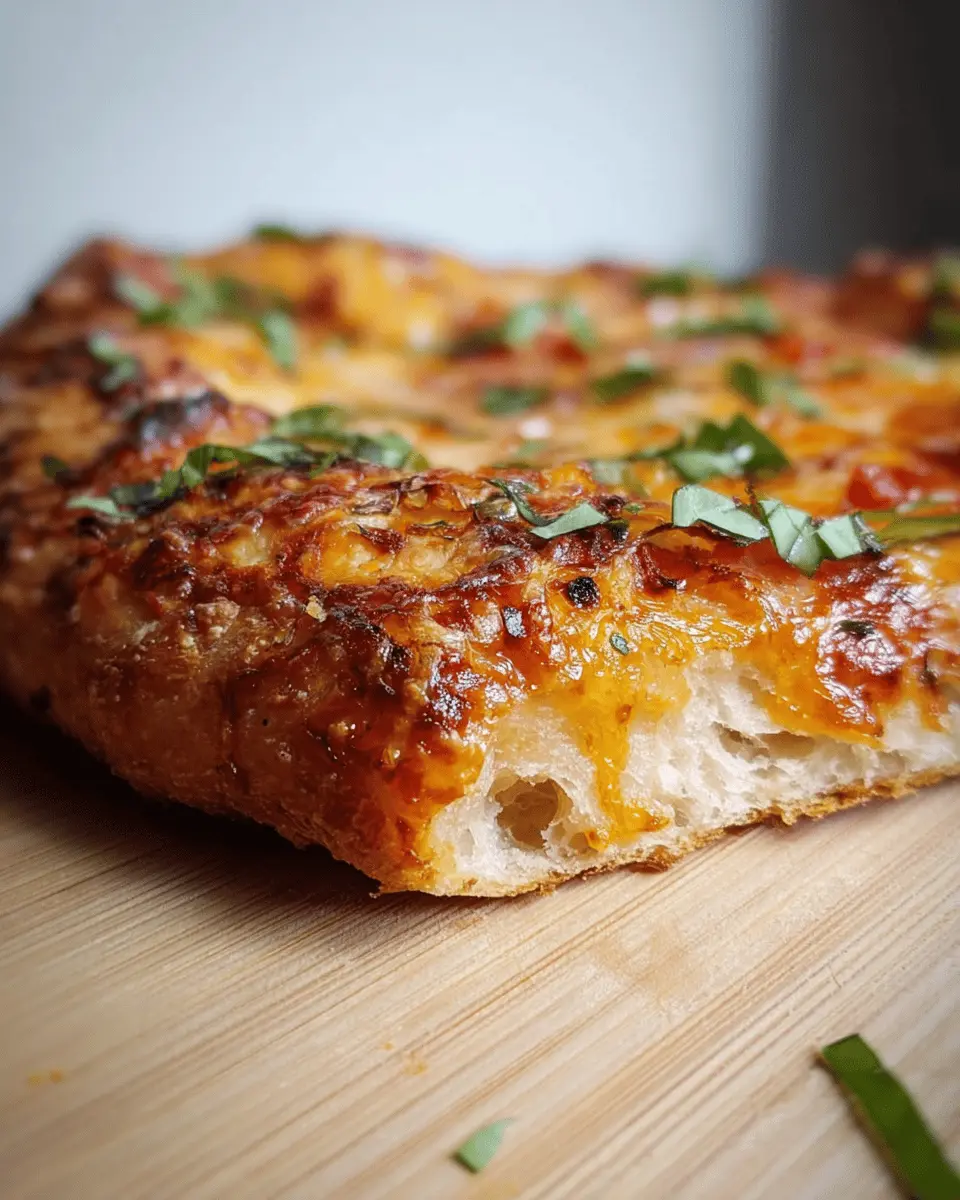
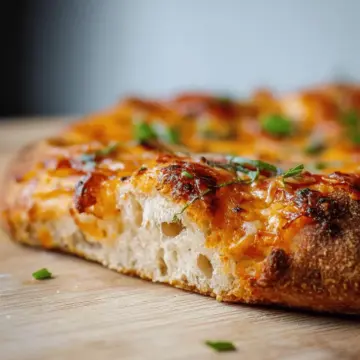
Topping and baking the pizza
This is where you can really get creative! Top your rolled-out dough with ¼ cup of your favorite sauce, 1-2 cups of desired toppings (think turkey bacon, chicken ham, and a variety of veggies), and about 1 and ½ cups of cheese. Once you’re ready, carefully slide your assembled pizza onto a pizza peel or the back of a baking sheet, and transfer it to a preheated pizza stone at 475 °F. Bake for 9-11 minutes until the crust is golden and the cheese is bubbly.
Once out of the oven, let your pizza cool on a rack for a few minutes. Then, slice, serve, and share the joy of your delicious creation made from scratch!
Variations on Artisan Pizza Dough
Whole Wheat Pizza Dough
Switching to whole wheat flour for your artisan pizza dough adds a delightful nuttiness and boosts the fiber content, making each slice a bit healthier. The process is the same—simply substitute all-purpose flour with whole wheat flour, and enjoy the earthy flavor that pairs beautifully with both traditional and contemporary toppings. If you need tips on using whole wheat flour, check out this guide on cooking with whole grains.
Herb-Infused Pizza Dough
Elevate your artisan pizza dough by incorporating fresh or dried herbs! Adding ingredients like oregano, basil, or rosemary directly into your dough creates an aromatic base that enhances your favorite toppings. You could even experiment with garlic powder or crushed red pepper for an unexpected kick. Adding herbs not only boosts flavor but can also introduce potential health benefits, like anti-inflammatory properties. Curious about herbal benefits? Explore more in this insightful Herbs and Spices benefits article.
Cooking tips and notes for Artisan Pizza Dough
The importance of temperature
When making artisan pizza dough, remember that temperature plays a crucial role in the fermentation process. Using water at room temperature helps activate the yeast properly. If your kitchen is chilly, consider warming the water slightly—just make sure it’s not hot, or you might kill the yeast! Maintaining an ideal room temperature during rising ensures a beautifully fluffy crust that rises perfectly.
Make-ahead tips for busy weeks
Life can get hectic, but you can still enjoy homemade pizza! Prepare your artisan pizza dough up to three days in advance. After the initial rise, simply stash it in the refrigerator. When it’s time to bake, it’ll be ready to go for a quick dinner! If you want to plan even further, consider freezing the dough after it’s risen on the counter. It’ll keep well for up to three months—just thaw it at room temperature before use.
For more tips on dough storage and pizza-making, check out Serious Eats or King Arthur Baking.
Serving Suggestions for Artisan Pizza Dough
Crafting the perfect artisan pizza dough is just the beginning! Here are some great ideas to elevate your pizza experience.
Creative Topping Combinations to Try
- Mediterranean Delight: Feta, olives, sun-dried tomatoes, and a sprinkle of oregano.
- BBQ Chicken: Chicken ham, BBQ sauce, red onions, and mozzarella.
- Veggie Supreme: Bell peppers, mushrooms, spinach, and ricotta for a creamy finish.
- Breakfast Style: Turkey bacon, eggs, and a mix of cheese for a morning twist.
Don't hesitate to mix and match your favorites; the possibilities are endless!
Pairing Your Pizza With Delicious Alternatives
To complement your artisan pizza dough, consider serving it with:
- A fresh side salad topped with lemon vinaigrette for a zesty touch.
- Roasted vegetables drizzled with balsamic glaze for something savory.
- A chilled sparkling water or homemade lemonade to balance out the flavors.
These pairings not only enhance your meal but also keep it light and enjoyable. How do you like to serve your pizzas? Let us know in the comments! Try out these ideas and kick your pizza game up a notch!
Time Breakdown for Artisan Pizza Dough
Planning your pizza night? Here’s a quick overview of the time required for making your artisan pizza dough.
Preparation Time
Gather your ingredients and mix everything together in about 20 minutes. It’s quick and simple!
Cooking Time
Once your dough is ready and topped, baking takes roughly 10 minutes to achieve that perfect golden crust.
Total Time
From start to finish, including resting the dough, expect about 2 hours and 30 minutes. This includes 2 hours of rising time, giving your dough that lovely texture.
By managing your time well, you can enjoy delicious homemade pizza with minimal fuss. If you're curious about the science of dough-making, check out this dough fermentation guide to deepen your baking knowledge! Happy cooking!
Nutritional Facts for Artisan Pizza Dough
Calories per Serving
For each serving of this delightful artisan pizza dough, you're looking at about 218 calories. This makes it a great base for your favorite pizza toppings while still keeping things relatively light!
Key Nutritional Components
Here’s a quick rundown of what's packed in this scrumptious dough:
- Carbohydrates: 45g – Provides the energy you need for your day.
- Protein: 7g – Essential for muscle repair and growth.
- Fat: 1g – A minimal amount, but it's primarily healthy fats.
- Sodium: 586mg – Important for hydration balance, but keep an eye on total intake.
- Fiber: 2g – Aids in digestion and contributes to feeling full.
This artisan pizza dough forms a substantial part of your meal, allowing for healthy and fulfilling choices when it comes to toppings. Whether you choose fresh veggies or lean proteins like turkey bacon or chicken ham, you can make your pizza as nutritious as it is delicious.
By trimming down on highly processed options and focusing on natural ingredients, you can enjoy your slice with a side of wellness! If you want to learn more about the benefits of whole grains or explore nutrition tips, check out the Whole Grains Council for some expert insights.
So, what will you top your artisan pizza with? Let’s get creative in the kitchen!
FAQ about Artisan Pizza Dough
How do I know when my dough has risen enough?
You’ll know your artisan pizza dough has risen sufficiently when it’s roughly doubled in size and the surface looks bubbly. A simple test? Gently poke it. If the dent remains and doesn’t spring back immediately, you’re all set for the next step!
Can I freeze the dough, and how?
Absolutely! You can freeze your dough for up to three months. After it has risen, wrap it tightly in plastic wrap and place it in an airtight bag. To use, just thaw it in the fridge overnight or at room temperature for about 3-4 hours. Head over to sites like Serious Eats for more tips on freezing dough.
What toppings work best with homemade pizza?
The beauty of homemade pizza lies in the toppings! Consider going with classic options like:
- Fresh mozzarella
- Turkey bacon
- Chicken ham
- Bell peppers
- Spinach
- Mushrooms
Just ensure not to overload your pizza to maintain that perfect crust!
Conclusion on Artisan Pizza Dough
Making your own artisan pizza dough at home transforms your cooking game, providing a delicious base for creativity. With just a few simple ingredients and a bit of patience, you’re set to impress friends and family. Enjoy the unique flavors, textures, and the satisfaction of creating your own gourmet pizzas!
For more tips on perfecting your pizza night, check out resources like Serious Eats or Kitchen Stories. Happy baking!
Artisan Pizza Dough
Equipment
- large bowl
- rubber spatula
- Pizza Stone
- parchment paper
- Rolling Pin
- Pizza Peel
Ingredients
Dough Ingredients
- 3 ⅔ cup flour all purpose or whole wheat
- 1 ½ cup water at room temperature
- 2 teaspoon fine sea salt
- 2 teaspoon instant yeast
Instructions
Dough Preparation
- Stir together the flour, salt and yeast in a large bowl. Mix in the water and use a rubber spatula or wooden spoon to work the dough until fully combined. Shape loosely into a ball.
- Cover the dough with plastic wrap or a tight lid and allow to rise at room temperature for 2-3 hours until bubbly and doubled in size.
- Optional: After rising, place covered in the refrigerator for up to 3 days.
- Preheat the oven to 475 °F. Place a pizza stone on the centre rack.
- Prepare 4 sheets of parchment paper. Rip into 12 inch/30 cm long sheet and lightly flour.
- Use a knife or spatula to divide the dough into 4 (or 8 for individual pizzas). Flour your hands and scoop ¼ of the dough out of the bowl, lightly shape into a round ball and place in the centre of the prepared parchment.
- Flour a rolling pin and starting from the centre of the dough, roll out, rotating the parchment after each roll in order to shape it into a circle. If it seems tough to roll, leave it for 5-10 minutes to allow the gluten to relax.
- Top with ¼ cup of sauce, 1-2 cups of desired toppings and 1 ½ cups of cheese.
- Slide the assembled pizza onto a pizza peel (still on the parchment) or the back of a large baking sheet. Carefully transfer onto the heated pizza stone.
- Bake for 9-11 minutes until the crust is golden and the cheese is lightly brown and bubbly.
- Transfer the cooked pizza off the baking stone and back onto the peel/baking sheet. Place on a cooling rack for a couple of minutes.
- Peel the parchment paper from the bottom, slice and serve.


Leave a Reply