
Introduction to Artisan Bread
The joy of homemade artisan bread
There's something truly magical about the aroma of homemade artisan bread filling your kitchen. It’s more than just a recipe; it's an experience that invites you to slow down and appreciate the art of baking. Each loaf tells a story, from the careful selection of ingredients to the joyful anticipation as it rises in the oven. Using just five simple ingredients, you can create a product that feels luxurious and comforting.
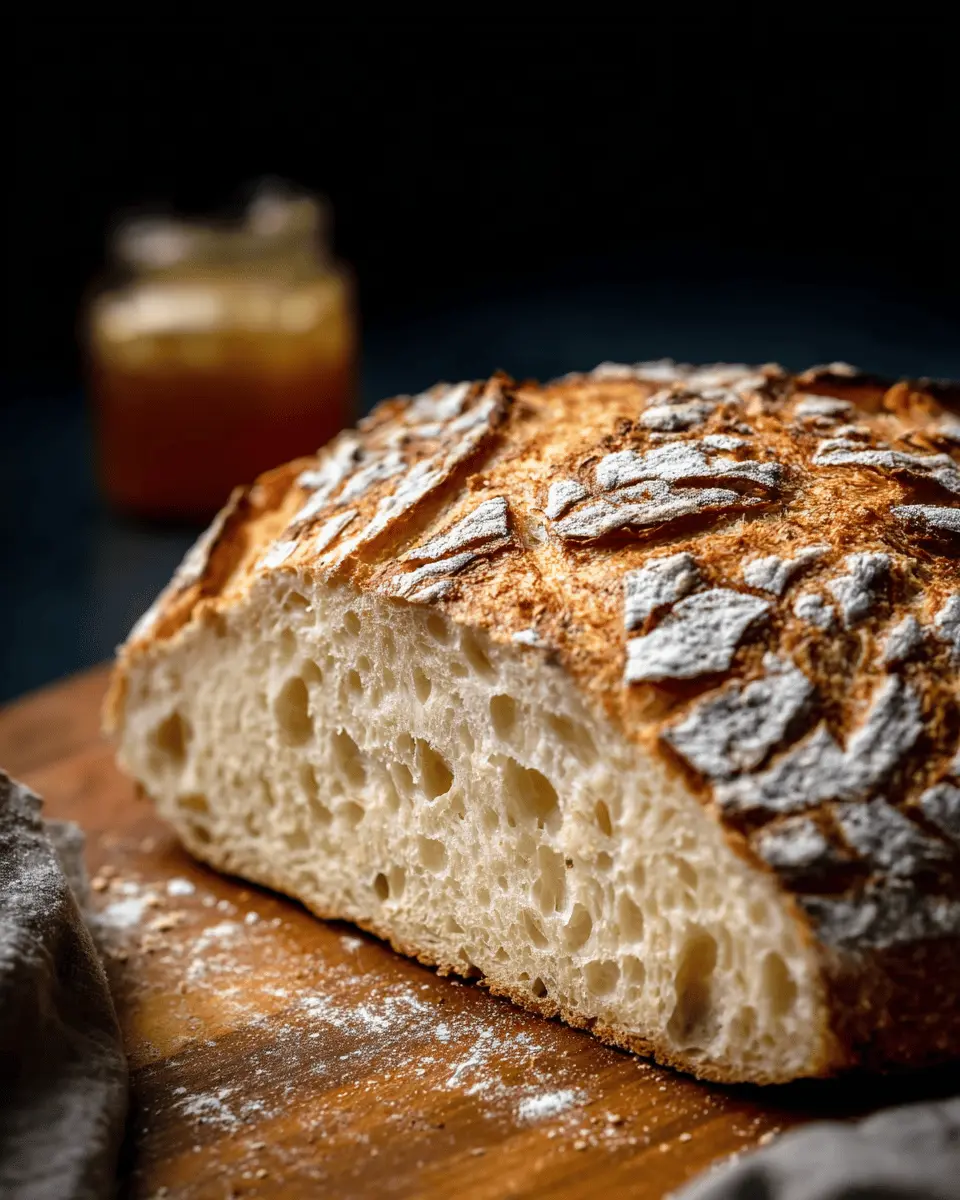
Making artisan bread at home can also deepen your appreciation for this timeless craft. Did you know that the process of kneading and shaping dough can be quite meditative? Plus, there’s a sense of accomplishment when you present your friends and family with a beautiful loaf, complete with a crisp crust and a soft, airy interior.
For those eager to take the leap into baking, our artisan bread recipe will guide you through essential techniques, giving you the confidence to craft your own masterpieces. Before long, you’ll be carving warm slices of bread, perfect for toasting or accompanying your favorite dishes. So roll up your sleeves, gather your ingredients, and let's embark on this delightful culinary journey together!
For further reading, check out King Arthur Baking for expert tips and additional resources.
Ingredients for Artisan Bread
Essential ingredients
When it comes to making a scrumptious artisan bread, there are just a few key ingredients you'll need. Here’s what you’ll gather:
- Instant yeast: 7 g (2 tsp) is crucial for that perfect rise.
- Sugar: Just a teaspoon of caster or superfine sugar (5 g) helps activate your yeast.
- Warm water: 300 ml (1.25 cups), a tad warmer than lukewarm, gives the yeast a cozy environment to flourish.
- Plain flour: 450 g (3.75 cups) is your main player, while an extra 60 g (½ cup) comes in handy for dusting and shaping the dough.
- Salt: 8.5 g (1.5 tsp) enhances flavor and strengthens the dough structure.
Optional tools and supplies
While not mandatory, a few additional tools will ease your baking journey:
- Dutch oven: Ideal for creating that crispy crust. If you don’t have one, fear not; a regular baking tray will suffice.
- Mixing bowl: A sturdy bowl for mixing your ingredients.
- Dough scraper: This handy tool helps manage sticky dough and keeps your workspace tidy. You can always use your hands if you prefer!
- Proving basket: For the second rise, to help shape your bread beautifully.
Baking artisan bread is a rewarding experience, and with the right components, you're well on your way to creating something exceptional! For more tips on bread-making, check out experts like King Arthur Baking.
Step-by-step Preparation for Artisan Bread
Baking artisan bread at home is an incredibly rewarding experience, and it’s easier than you might think! The process is straightforward, and with just a few ingredients, you can achieve that crunchy crust and soft interior we all love. Let’s break it down into manageable steps for your artisan bread recipe.
Activate the yeast
The first step to delicious artisan bread is activating the yeast. In a large bowl or the bowl of a stand mixer, combine:
- 7 g (2 tsp) instant yeast
- 5 g (1 tsp) sugar
- 300 ml (1.25 cups) warm water (aim for lukewarm, not hot)
Let this mixture sit for about 5 minutes until it becomes bubbly and fragrant. Activating the yeast is crucial; it ensures your bread rises beautifully. This method and the science behind yeast can be explored more on reputable cooking sites like King Arthur Baking.
Combine flour and salt
Once your yeast is activated, it’s time to add the dry ingredients. In the same bowl, mix in:
- 450 g (3.75 cups) plain (all-purpose) flour
- 8.5 g (1.5 tsp) salt
Ensure you mix these well until there are no dry flour spots. The salt helps to control the activity of the yeast, so it’s important not to skip this step!
Knead the dough
Now, let’s get hands-on! Either use the dough hook on your stand mixer to knead the dough for about 10 minutes on a medium setting or do it by hand. If kneading by hand, oil the surface and your fingers with a little olive oil to prevent sticking. Knead until the dough transforms into a smooth, elastic ball; don’t worry if it’s sticky—this is totally normal for artisan bread.
First proving
After kneading, place your dough in a lightly oiled bowl. Cover it with cling film or a damp towel and let it prove for about 1 hour, or until it has doubled in size. This is where the magic happens—your dough will develop flavor and structure!
Shape the dough
Once the first proving is complete, it’s time to shape your dough. Lightly flour your work surface and gently turn the dough out onto it. Without knocking out too much air, tuck the edges of the dough into the center, creating a round shape. If it’s too sticky, use a bit more flour to prevent it from sticking to your hands.
Second proving
Next, transfer your shaped dough to a floured proving basket or bowl, seam-side down. Cover it again and let it prove for about 30 minutes. This second prove allows for a bit more rise and enhances the overall texture.
Preheat the oven
While your dough is proving, preheat your oven to 230°C (450°F) with a Dutch oven inside. Preheating the oven not only gets it hot enough to bake the bread but also ensures you achieve that crispy crust characteristic of artisan loaves.
Bake in the Dutch oven
Once the second prove is done, carefully place a long piece of parchment paper over your proving basket and flip it over. The dough should slide right onto the parchment. Use the paper to help lower the dough into the hot Dutch oven. Place the lid on and bake for 30 minutes. Then, take off the lid and bake for an additional 10-15 minutes until it’s beautifully golden brown.
Cooling the bread
When your artisan bread is done baking, remove it from the oven and let it cool on a wire rack before slicing. This cooling period is vital; allowing the steam to escape ensures your bread retains its artisan texture.
And there you have it! With these steps, you can master the art of baking your own artisan bread right at home. Not only is this bread fantastic for breakfast with some butter or for a cozy dinner, but it will also fill your home with an irresistible aroma. Happy baking!
Variations on Artisan Bread
Herb-infused artisan bread
One way to elevate your artisan bread recipe is to infuse it with herbs. Imagine the aroma of fresh rosemary or thyme wafting through your kitchen! To create this variation, simply mix in a tablespoon or two of chopped fresh herbs into your dough during the mixing process. Dried herbs work too—just use half the amount. This adds a flavorful twist that pairs wonderfully with soups or as a gourmet sandwich base.
Whole wheat artisan bread
For a heartier option, why not try whole wheat artisan bread? Substituting half of the all-purpose flour with whole wheat flour not only boosts the fiber content but also gives a nuttier flavor. You may need to slightly increase the water since whole wheat flour can absorb more moisture. It’s a wholesome twist on your classic artisan bread recipe that everyone will love!
Whether you opt for the herbal charm or the whole grain goodness, these variations are sure to delight your taste buds!
Cooking Tips and Notes for Artisan Bread
Kneading vs. No-Knead Methods
When it comes to baking your artisan bread, you have two main paths: kneading or the trendy no-knead method. Kneading develops the gluten, leading to that perfect, airy texture. If you prefer a hands-off approach, the no-knead method allows for longer fermentation, enhancing flavor and texture while requiring minimal effort. Just remember, if you opt for no-kneading, give your dough extra proving time—aim for overnight refrigeration for the best results. Curious about the science behind it? Check out this in-depth guide on gluten development for more nuances.
Tips for Achieving the Perfect Crust
A crusty exterior is essential for that authentic artisan bread feel, and here are some tips to nail it:
- Steam is your friend. If using a Dutch oven, the trapped steam creates a crispy crust. For a home oven, place a pan of hot water at the bottom for a similar effect.
- High temperature is key. Your oven should be preheated to 230°C (450°F) to achieve that golden-brown finish.
- Let it cool. Resist the temptation to slice right away! Allow the bread to cool completely on a rack to maintain its structure and texture.
These tips will help you create a loaf that’s not just delicious but also looks stunning. Happy baking!
Serving Suggestions for Artisan Bread
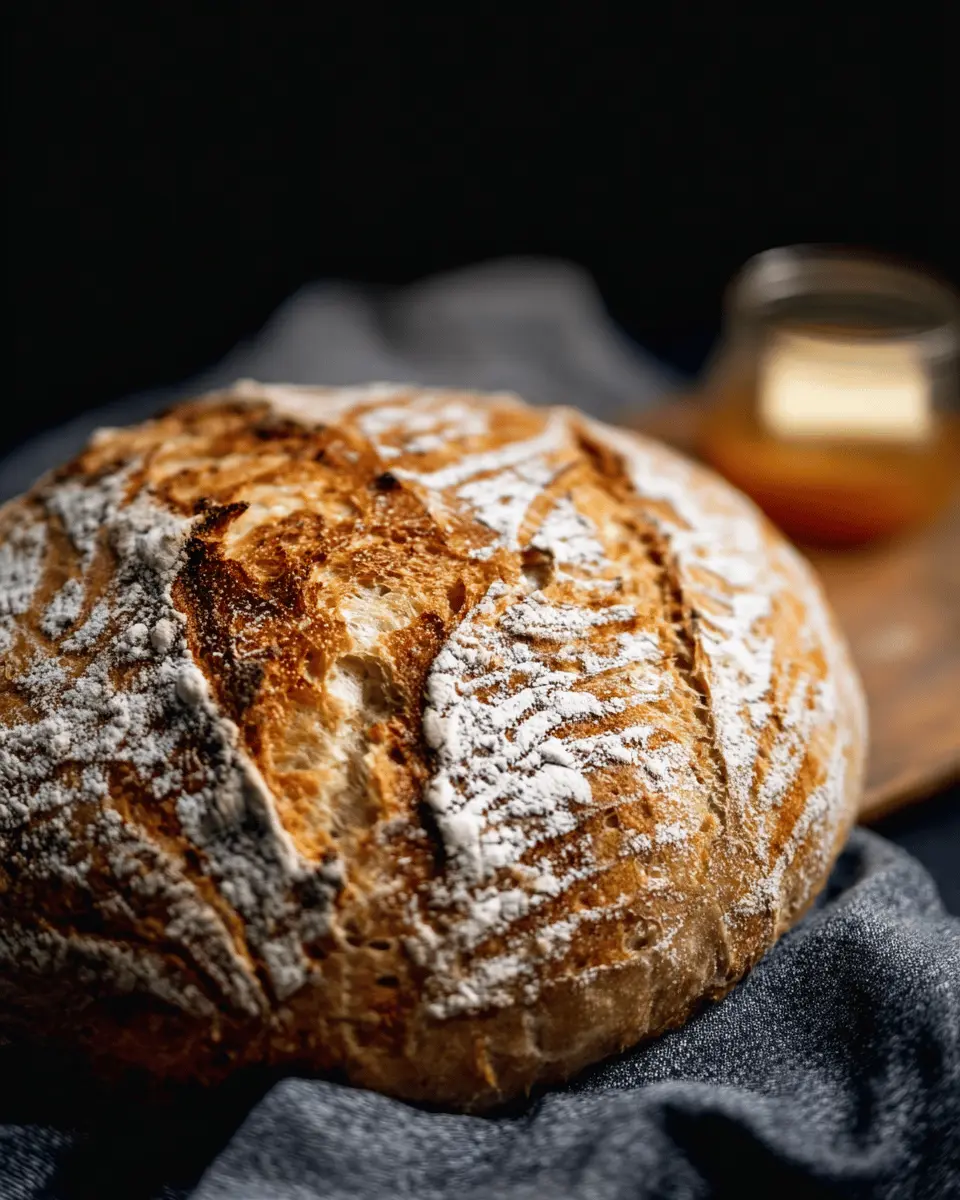
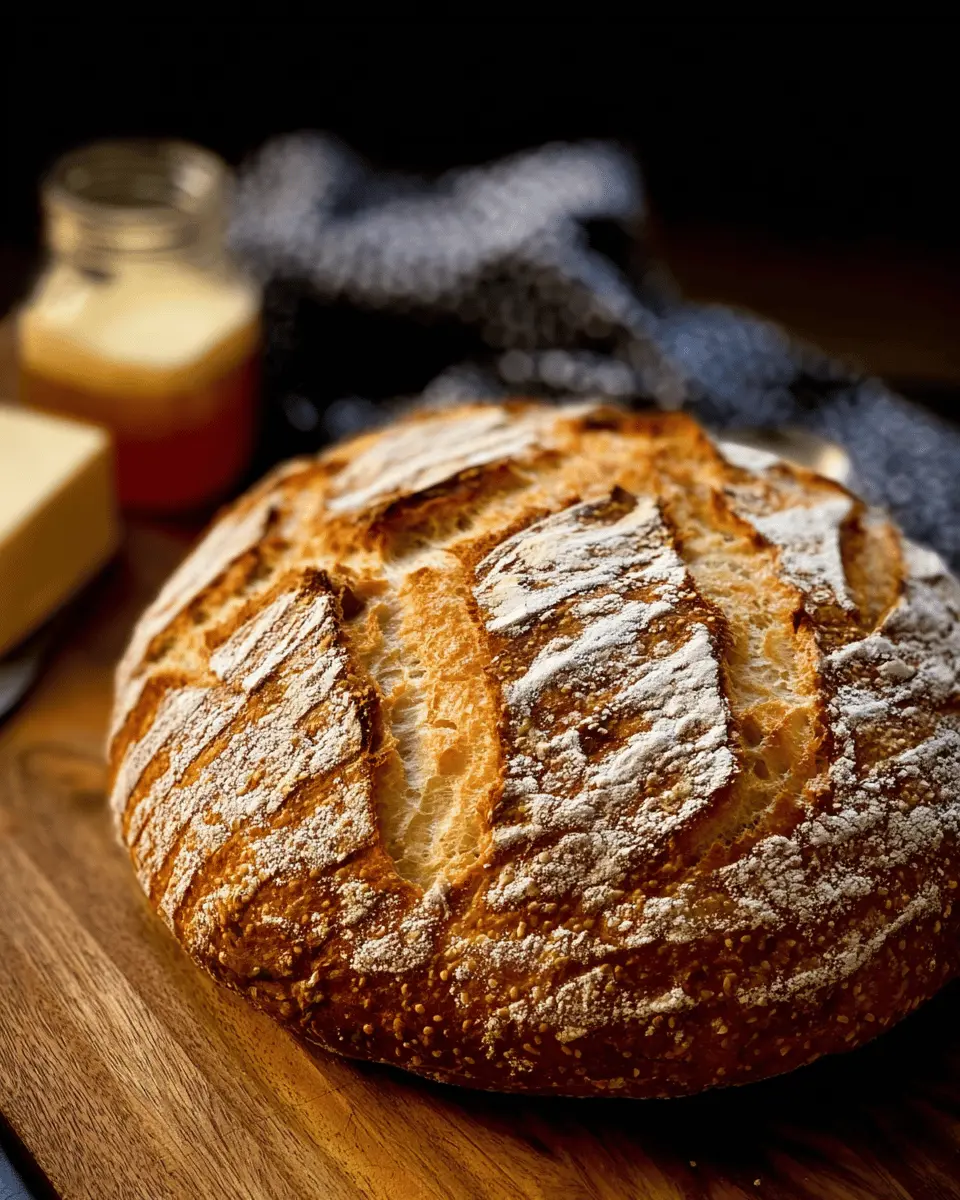
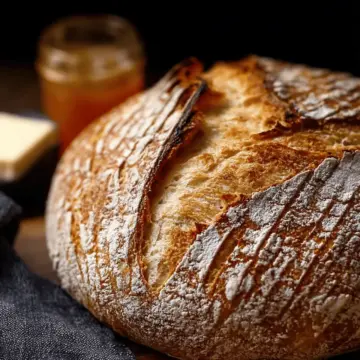
Enjoying with spreads
There’s nothing quite like slathering a slice of freshly baked artisan bread with your favorite spreads. Try pairing it with creamy butter, flavorful hummus, or even a tangy cream cheese. For a sweet treat, jams or honey can elevate your breakfast or snack time. If you're feeling adventurous, mix some herbs or spices into the butter for extra flavor!
Pairing with homemade soups
What better way to enjoy your delightful artisan bread recipe than alongside a cozy bowl of homemade soup? Whether it’s a classic tomato basil, comforting chicken noodle, or a hearty beef vegetable, dipping that crusty bread into warm broth is an experience you won’t forget. The chewy texture of the bread complements the creamy or brothy bases, making every bite a symphony of flavors. For ideas, check out popular soup recipes on sites like BBC Good Food.
Time Breakdown for Artisan Bread
When you're getting ready to dive into this artisan bread recipe, knowing the time involved is essential. Here’s a handy breakdown:
Preparation Time
In just 15 minutes, you’ll mix and knead your ingredients to create that beautiful dough. Setting aside this small chunk of time ensures your artisan bread will soon be fresh and warm.
Baking Time
After the dough has risen to perfection, it’s time to bake! The total baking time is around 45 minutes, providing you with the ideal crusty, golden exterior.
Total Time
All in all, you’ll need approximately 2 hours and 30 minutes from start to finish. This includes prep, rising, and baking time. Perfect for a weekend project, don’t you think?
Want to make your first loaf of artisan bread? Check out this comprehensive guide on bread-making basics for more tips and tricks!
Nutritional Facts for Artisan Bread
Calories per slice
If you’re wondering how many calories are packed into each slice of this delicious artisan bread recipe, it's approximately 156 calories. Perfect for that quick breakfast toast or as a side for dinner, you can enjoy guilt-free!
Carbohydrates and protein content
Each slice contains about 33 grams of carbohydrates and 5 grams of protein. This balance makes it a satisfying choice for a meal or snack. Pair it with your favorite spreads or toppings for a delightful experience!
For more insights into the health benefits of incorporating bread into your diet, check out Healthline and Nutritional Sciences for expert information.
FAQs about Artisan Bread
Can I prove the dough overnight?
Absolutely! Proving your dough overnight in the refrigerator not only saves time but also enhances the flavor. Just cover it tightly to prevent drying out. When you’re ready to bake, simply remove the dough, shape it, and let it rest at room temperature for a final 30 minutes before baking. This method often results in a richer taste and texture.
What's the best way to store artisan bread?
To keep your delicious artisan bread fresh, the key is proper storage. If you plan to eat it within a day, simply leave it out on a cutting board, cut-side down. For longer freshness, wrap the loaf in foil once cooled and keep it at room temperature. Avoid plastic bags, as they can soften the crust.
Can I freeze artisan bread for later use?
Yes, freezing is a fantastic option! After your bread cools completely, slice it and place the pieces in an airtight container or freezer bag. This way, you can easily defrost individual slices as needed, ensuring that your homemade artisan bread remains delightful even weeks later. Enjoy your baking!
Conclusion on Artisan Bread
The Satisfaction of Baking Your Own Bread
There's nothing quite like the satisfaction of baking your own artisan bread. Every slice is a testament to your effort, skill, and love for cooking. The delightful aroma fills your home, and the crispy crust combined with a soft interior creates a perfect balance. So roll up your sleeves and get started – your taste buds will thank you!
Artisan Bread Recipe
Equipment
- Stand Mixer
- Dutch oven
- Bowl
- clingfilm
- baking parchment
Ingredients
- 7 g instant yeast
- 5 g sugar (caster or superfine)
- 300 ml warm water slightly warmer than lukewarm, but not hot
- 450 g plain (all-purpose) flour PLUS ½ cup (60g) for dusting and shaping
- 8.5 g salt regular table salt/Kosher salt
Instructions
- Add the yeast, sugar, and warm water to the bowl of your stand mixer or to a large bowl. Leave for 5 minutes, until the yeast starts to foam.
- Add the flour, then the salt. Mix together using the dough hook attachment or mix together with your hands until fully combined.
- Using the dough hook, knead the dough on a medium setting for 10 minutes. If kneading by hand, oil the surface and your hands, and knead for 10 minutes. It will be a sticky dough.
- Once kneaded, place the dough in an oiled bowl. Cover with clingfilm or a wax wrap and prove for 1 hour until doubled in size.
- Sprinkle the work surface with ¼ cup (30g) flour and tip the dough out onto it. Sprinkle with a tablespoon of flour.
- Shape the dough by pulling a piece from the outside into the middle. Continue this until the dough no longer sticks.
- Turn the dough over and finish rounding it out by hand.
- Place the dough in a well-floured proving basket or floured bowl, seam-side down. Cover and prove for 30 minutes.
- Preheat the oven to 230C/450F with a Dutch oven inside.
- After the second prove, remove the cover and place a piece of parchment on top of the bowl. Flip the bowl, letting the dough fall onto the parchment.
- Carefully take the hot Dutch oven out and remove the lid. Use the parchment to lower the bread into the pot. Replace the lid.
- Bake for 30 minutes, remove the lid, and bake for an additional 10-15 minutes until golden brown.
- Remove from the oven and allow to cool completely on a cooling rack before slicing and serving.


Leave a Reply