
Introduction to Garlic Bread Rolls
Garlic bread rolls are a delightful twist on a classic favorite, combining the comforting warmth of freshly baked rolls with an irresistible garlic flavor. But why settle for store-bought options when homemade garlic bread rolls reign supreme?
Why Homemade Garlic Bread Rolls Reign Supreme
Crafting your own garlic bread rolls brings a level of satisfaction that simply can't be matched. For starters, the freshness is unbeatable. You can customize the recipe with your favorite herbs or even experiment with different types of garlic for versatile flavor profiles. Plus, you can make them as garlicky as you desire— no more worrying about underwhelming flavor from pre-packaged versions!
Did you know that baking at home often leads to healthier choices? By using quality ingredients and controlling the additives, you can create a guilt-free indulgence. According to various culinary experts, scents from fresh-baked goods can also uplift your mood, making this recipe not just about the taste but enhancing your entire dining experience.
So gather your ingredients, roll up your sleeves, and let’s dive into creating these soft, fluffy garlic bread rolls that will leave your guests coming back for seconds. If you don't believe us, try making a batch and see the magic for yourself!
Ingredients for Garlic Bread Rolls
Essential Ingredients for Soft and Fluffy Rolls
Creating the perfect garlic bread rolls starts with the right ingredients. Here’s what you’ll need:
- 4 ½ tablespoons unsalted butter: Adds richness to your dough.
- 2 tablespoons minced garlic: Fresh garlic is key for that classic flavor.
- 3 ½ cups + 1 tablespoon all-purpose flour: Essential for the ideal roll texture.
- 3 tablespoons chopped fresh parsley: Brightens up the taste with freshness.
- 1 tablespoon granulated sugar: Helps the yeast activate and adds a hint of sweetness.
- 2 ¼ teaspoons instant yeast: This is crucial for light and fluffy rolls.
- 1 teaspoon fine sea salt: Enhances all the flavors.
- 1 cup of warmed whole or 2% milk: Acts as the liquid that binds everything together.
- 1 large room-temperature egg: Adds structure to your rolls.
- An additional beaten egg for brushing: Gives a lovely golden finish.
Optional Additions for Extra Flavor
Want to take your garlic bread rolls up a notch? Here are some optional ingredients to consider:
- Cheese: A sprinkle of grated Parmesan or mozzarella inside the roll adds a delightful flavor.
- Spices: A touch of Italian seasoning or crushed red pepper can give a wonderful kick.
- Olive oil: Swapping out some butter for this can create a Mediterranean twist.
For a richer experience, you might also want to explore different garlic varieties to enhance your dish further. Happy baking!
Preparing Garlic Bread Rolls
Making garlic bread rolls at home is both a delightful experience and a rewarding treat for your taste buds. Whether for a cozy dinner or a festive gathering, these rolls add a burst of flavor to the table. Let’s walk through the preparation step-by-step to ensure your garlic bread rolls come out perfectly!
Gather and prepare the necessary equipment
Before diving into the fun part of mixing and kneading, it’s vital to have all your tools ready. You’ll need:
- A 9x13 baking pan for optimal roll shaping.
- A stand mixer with a dough hook attachment (or your hands for a workout!).
- Mixing bowls for combining ingredients.
- A spatula for scraping and folding.
Having everything in place makes cooking smoother and keeps stress at bay.
Combine dry ingredients for the perfect foundation
Start by measuring out your dry ingredients accurately. In a large mixing bowl, combine 3 ½ cups of all-purpose flour, 1 tablespoon of granulated sugar, 2 ¼ teaspoons of instant yeast, and 1 teaspoon of fine sea salt. Mixing dry ingredients first ensures even distribution of the yeast and salt, which are vital for the rolls' rise and flavor.
For best results, consider using a kitchen scale for precise measurement (you'd be surprised how small inaccuracies can affect your bake!).
Incorporate wet ingredients, including that delectable garlic butter
Next, let’s talk about the real star of this dish—garlic butter! In a small pot, melt 4 ½ tablespoons of unsalted butter with 2 tablespoons of minced garlic. Cook until fragrant but not browned, and let it cool slightly. Stir this melted goodness into your dry ingredients, along with 1 cup of warmed milk (to about 110°F) and 1 large room-temperature egg. Mix until a loose dough forms.
Knead until soft and tacky
Now, it's time for some hands-on action! Attach your dough hook and knead the mixture on low speed for 10-12 minutes. You're aiming for a smooth, soft, and slightly tacky texture. If it’s too sticky, don’t hesitate to add flour gradually, just a tablespoon at a time.
Shape the dough into rolls and let rise
Divide the kneaded dough into 12 equal portions. Roll each piece into a ball, pinching the seams tight. Place them in your greased baking pan, cover with a towel, and let them rise in a warm area for about 1-2 hours, or until doubled in size. This step is vital for those airy rolls we crave.
Bake to golden perfection
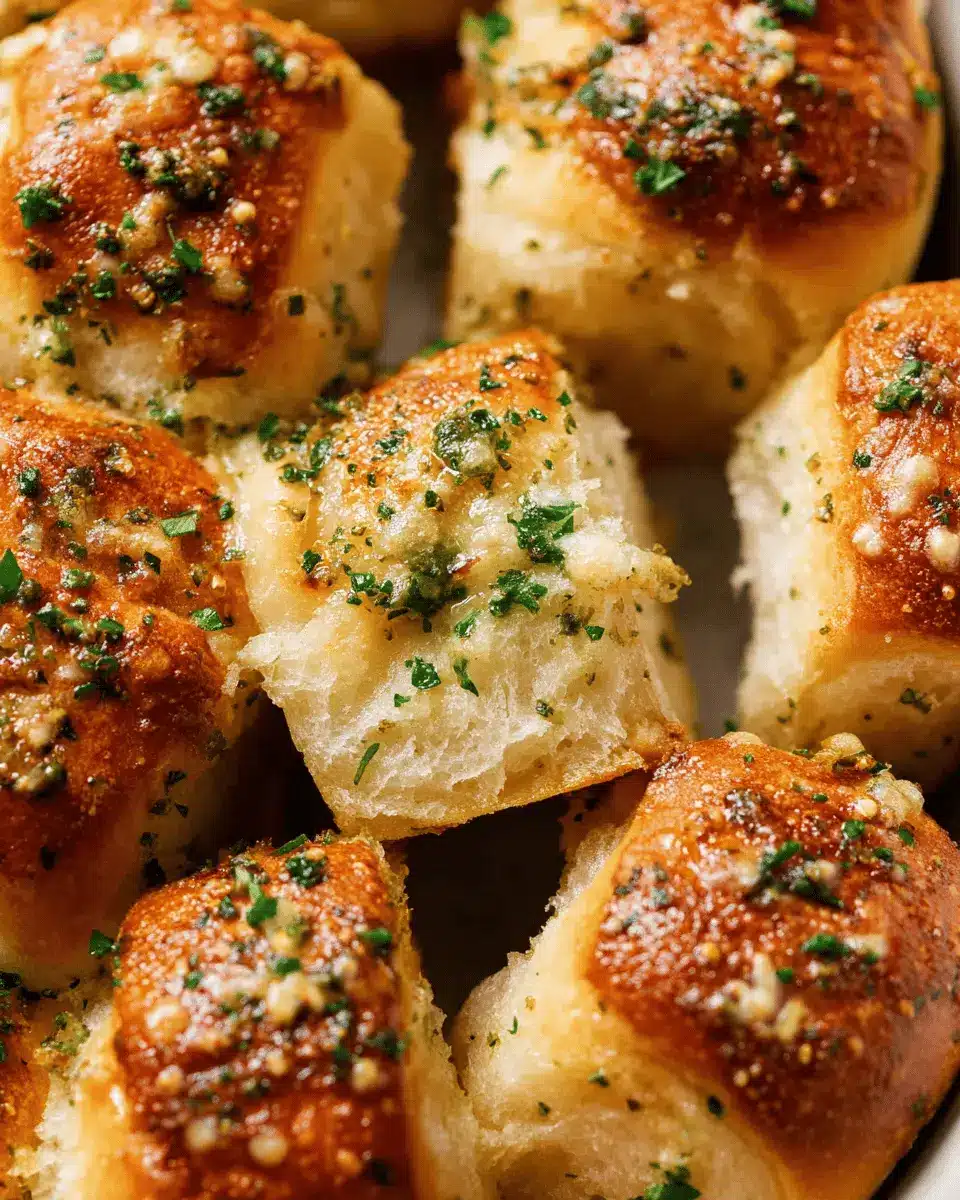
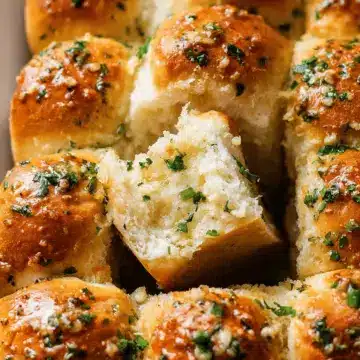
Once your garlic bread rolls have risen beautifully, preheat your oven to 350°F (180°C). Brush the top of each roll with a beaten egg for that glossy finish. Bake for 20-30 minutes until golden brown, filling your kitchen with irresistible aromas.
Brush with garlic herb butter for the final touch
When the rolls emerge from the oven, immediately brush them with your prepared garlic herb butter (made from that melted garlic butter reserved earlier). This step not only enhances flavor but gives a lovely sheen. Finish with a sprinkle of flaky sea salt for that gourmet touch!
With these steps, you’ll have wonderfully fluffy and garlicky rolls that will elevate any meal. Enjoy crafting and sharing these delightful bites with family and friends—after all, sharing is where true culinary joy lies! For more tips on baking bread, check out King Arthur Baking for expert advice and inspiration.

Variations on Garlic Bread Rolls
Garlic bread rolls are a delight in their classic form, but there’s always room for creativity! Here are two variations that can elevate your baking experience.
Adding Different Herbs for a Unique Spin
For a twist on traditional garlic bread rolls, consider incorporating aromatic herbs like rosemary or thyme. Simply mix in a tablespoon of chopped fresh herbs into the dough for an earthier flavor. Not only does this add depth to your rolls, but it also fills your kitchen with an irresistible aroma, making it a feast for the senses!
Cheesy Garlic Bread Rolls
If you’re a cheese lover, you’ll adore cheesy garlic bread rolls! Just fold in shredded mozzarella or a mix of cheeses like cheddar and parmesan into the dough before shaping. The melted cheese adds a gooey, rich texture inside, complementing the garlic goodness when they're fresh from the oven. Serve them warm and watch them disappear quickly!
For more ideas on delicious variations, you can explore recipes on Food Network or Serious Eats.
Cooking Tips and Notes for Garlic Bread Rolls
Proper Measuring Techniques for Baking Success
Precision is key when making Garlic Bread Rolls. Use the spoon-and-level method for your flour; fluff it, spoon it into your measuring cup, and level it off with a knife. This simple trick helps prevent using excess flour, which can lead to dense rolls. For the best accuracy, consider investing in a kitchen scale.
Yeast Tips for Different Varieties
When using instant yeast, simply mix it with your dry ingredients and proceed. If you opt for active dry yeast, activate it first: combine it with warm milk and sugar, allowing it to foam for about 5 minutes. This ensures your rolls rise beautifully! Always let the dough double in size before baking for fluffy, delectable results.

Serving Suggestions for Garlic Bread Rolls
Pairing with Soups or Salads
Garlic Bread Rolls are the perfect companion for a hearty soup or a fresh salad. Their warm, buttery goodness complements flavors in classic tomato bisque or a crisp Caesar salad beautifully. Imagine digging into a bowl of loaded potato soup, tearing off a hunk of bread, and dipping it into the creamy broth—heavenly! Consider pairing with this Creamy Tomato Soup recipe for a delightful meal.
Using as a Base for Sliders
Transform your Garlic Bread Rolls into eye-catching sliders that everyone will love! Slice them in half and fill them with savory options like turkey bacon, chicken ham, or grilled veggies topped with zesty sauces. This not only makes for a fun meal but also elevates your usual dinner to an unforgettable gathering. Sliders are ideal for entertaining—check out these slider recipe ideas for inspiration!
Time Breakdown for Garlic Bread Rolls
Preparation Time
Getting started on your Garlic Bread Rolls is a breeze! Allow about 20-30 minutes for preparation. This includes measuring, mixing, and kneading the dough.
Rising Time
Once your dough is ready, give it some time to rise. Set aside 1-2 hours for the dough to double in size in a warm spot. This wait is essential for soft, fluffy rolls.
Baking Time
When it's time to bake, preheat your oven and let your rolls bake for 20-30 minutes. You'll know they’re done when they’re golden brown and fragrant!
Total Time
In total, you're looking at around 2-3 hours from start to finish, including prep, rising, and baking. Trust me, the wait will be worth it when you taste these delicious rolls!
Feel free to check out more about the science of baking and yeast on reputable sites like King Arthur Baking or learn about perfecting your knead technique from experts at Serious Eats.
Nutritional Facts for Garlic Bread Rolls
Calories per roll
Each garlic bread roll contains approximately 180 calories, making them a delightful yet indulgent side dish to any meal.
Carbohydrates and protein content
With around 30 grams of carbohydrates and 5 grams of protein per roll, these tasty bites offer a satisfying balance of energy and nourishment. Perfect for a busy day!
Sodium levels
A single roll contains about 250 mg of sodium, providing flavor without overwhelming your diet. Just be mindful if you're watching your salt intake! For more detailed nutritional guidelines, check out resources from the USDA.
These garlic bread rolls are not just delicious; they also offer a lovely addition to your meal prep arsenal! Want to know how to make them? Keep reading!
FAQs about Garlic Bread Rolls
How do I make these rolls ahead of time?
You can easily prepare garlic bread rolls the night before! Once shaped and placed in their baking pan, cover them tightly with plastic wrap and refrigerate overnight. The next day, let them sit at room temperature until they double in size, which could take a few hours. This way, you can enjoy freshly baked rolls without the last-minute rush.
Can I freeze garlic bread rolls?
Yes, freezing is a great option! After baking, allow the rolls to cool completely. Then, transfer them to an airtight container or freezer bag and store them for up to one month. When you’re ready to enjoy them, simply reheat in the oven for a delightful, fresh-tasting experience.
What should I serve with garlic bread rolls?
These garlic bread rolls are incredibly versatile! Pair them with hearty soups like minestrone or creamy tomato basil. They also make an excellent side for dishes like chicken alfredo or a simple garden salad. For a casual gathering, serve them alongside a platter of turkey bacon bites or chicken ham for a delightful mix of flavors.
For more tips on meal pairings, check out this guide to perfect side dishes.
Conclusion on Garlic Bread Rolls
Homemade Garlic Bread Rolls are truly a labor of love, bringing unparalleled flavor and warmth to your table. There's nothing quite like the satisfaction of creating these soft, buttery rolls from scratch! I encourage you to try your hand at this recipe—your taste buds will thank you!
Garlic Bread Rolls
Equipment
- 9x13 baking pan
Ingredients
Dough
- 4.5 tablespoons unsalted butter
- 2 tablespoons minced garlic
- 3.5 cups all-purpose flour plus 1 tablespoon for adjusting consistency
- 3 tablespoons chopped fresh parsley
- 1 tablespoon granulated sugar
- 2.25 teaspoons instant yeast
- 1 teaspoon fine sea salt
- 1 cup whole or 2% milk warmed to 110°F
- 1 large egg room temperature
- 1 beaten egg for brushing tops of rolls
Garlic Butter
- 2 tablespoons unsalted butter
- 1 tablespoon minced garlic
- 1 tablespoon chopped fresh parsley
- flaky sea salt for finishing
Instructions
Preparation
- Lightly butter the bottom and sides of a 9x13 pan and set it aside.
- In a small pot, melt the butter and add the minced garlic. Cook for 1-2 minutes or until the garlic is fragrant. Take off the heat and cool while you measure the other ingredients.
- In a stand mixing bowl, combine the flour, parsley, sugar, yeast, and salt. Then add the warmed milk, egg, and garlic butter from above. Knead on low speed with the dough hook until the dough looks smooth and feels soft and tacky, about 10-12 minutes.
- Cut the kneaded dough into 12 equal portions. Shape each piece of dough into a smooth ball with your hand. Pinch the bottom of the roll where the seam comes together to keep it tight. Then place the shaped dough balls into the prepared baking pan.
- Cover the top with plastic wrap or a clean kitchen towel and set them in a warm place to rise until doubled in size, about 1-2 hours.
- Preheat the oven to 350°F.
- Brush the tops of the rolls with the beaten egg wash. Then bake the dinner rolls for 20-30 minutes, or until the tops are golden brown.
- While the rolls are baking, make the garlic butter. Melt the butter in a pot and add the minced garlic. Cook for 1-2 minutes until the garlic is fragrant. Then remove it from the heat and stir in the parsley. When the rolls come out of the oven, immediately brush them with the garlic butter.
- Sprinkle with flaky sea salt if desired, and serve warm!


Leave a Reply